

What Is My DNS Server?
Our DNS server checker tool verifies and displays the DNS servers your device is using. It also reveals the country and the owner (ISP) of the DNS server processing your requests.
How our DNS checker works
We ask your browser to look up a series of one-off web addresses created just for your test, that are hosted on our own DNS server. When your DNS server comes looking for it, we record exactly which servers made the requests. We don’t read the settings on your device or route. We simply report the DNS servers that contact us, and we do not store your results.
Not the address you entered? That’s normal.
Large DNS providers don’t use a single server. The address you enter, such as 8.8.8.8, is simply the ‘front door’ that receives your DNS lookup request. Behind it, a separate server goes out and finds the answer, and that server has its own public IP address. It’s that address that reaches our test server, and so it’s what our tool shows.
That outgoing address almost always belongs to the same provider. So the quickest way to confirm your settings are working is to check the ‘ISP’ column rather than the IP address itself. It should show your DNS provider’s name, or that of its parent company. For example, an OpenDNS server may appear under Cisco, which owns OpenDNS.
You can easily change or hide your DNS server details using a trustworthy VPN.
What is a DNS Server?
DNS stands for Domain Name System and is comparable to a phone directory for the internet.
Their purpose is to return information associated with domain names, such as what the IP addresses of www.top10vpn.com are. Other information for a domain can include which server to deliver emails to, information on spam email control, verification of domain ownership, and much more. Read more on the process of handling a DNS lookup in the section below.
It’s basically a human-friendly way to identify devices/computers on the internet to communicate with.
There are two kinds of DNS server:
Authoritative servers hold the actual records for a domain. They’re the source of truth for where a domain (like top10vpn.com) lives.
DNS resolvers (sometimes called recursive servers) are the ones your device talks to. A DNS resolver doesn’t hold a directory of its own. Instead, it asks authoritative servers on your behalf, and remembers the answer for a while so the next lookup is faster.
When people say “my DNS server”, they almost always mean their resolver.
How Do DNS Servers Resolve DNS Queries?
When you type a web address, your device asks it’s DNS resolver to find the matching IP address. The resolver works through three steps:
- Root servers point it to whoever handles the ending segment, e.g. .com, .net, etc.
- TLD server point it to the authoritative servers for that specific domain.
- Authoritative servers hand back the IP address of the server hosting the site.
Your browser then connects to that address and loads the page.
Despite the number of steps involved, the process of resolving a DNS query and displaying a website’s content happens very quickly, typically in under a second. Your DNS resolver remembers the answer, so next time it’s used, it responds instantly.
Why Should I Regularly Check My DNS Server?
To stay safe on the internet, you must verify that your computer’s DNS requests are fulfilled by a trustworthy server.
Connecting to an untrustworthy DNS server carries serious security risks, such as opening you up to potential identity theft and malware infections. Can you really trust the DNS server of the Wi-Fi network you’ve connected to in a coffee shop?
If you unknowingly use a DNS server operated by a bad actor, it could redirect your browser to fake and dangerous websites.
Malware can also change the DNS settings on your computer or router so that your requests are answered by servers the attacker controls. This is known as DNS hijacking. A related technique, DNS cache poisoning, feeds false answers to a legitimate DNS server so that it hands out the wrong IP address.
These threats are very real. DNSChanger infected millions of computers before it was shut down, and campaigns like GhostDNS and Roaming Mantis have targeted home routers specifically, changing their DNS settings remotely.
To fully check your DNS requests are being fulfilled by a trusted DNS server, run a DNS server check with our tool prior to visiting and/or logging into a website.
To find a DNS address or PTR record based on a particular IP address, you can use our reverse DNS lookup tool, instead.
How to Find Your DNS Server on Windows and Mac
Finding your DNS server’s IP address on your PC or Mac device is easy. Below are simple step-by-step instructions for each device.
How to Find Your DNS Server IP Address on Windows
The quickest way to find your DNS server address on Windows is to:
- Open the Command Prompt by pressing Windows key, typing
cmdand press Enter. - In the Command Prompt window that has opened, type
ipconfig /alland press ‘Enter’. - You’ll see results that look like these, one entry per network adapter:
Wireless LAN adapter WiFi Connection-specific DNS Suffix . : local.lan Description . . . . . . . . . . . : Intel(R) Wi-Fi Physical Address. . . . . . . . . : 00-93-37-00-00-00 DHCP Enabled. . . . . . . . . . . : Yes Autoconfiguration Enabled . . . . : Yes IPv4 Address. . . . . . . . . . . : 192.168.1.10(Preferred) Subnet Mask . . . . . . . . . . . : 255.255.255.0 Lease Obtained. . . . . . . . . . : 12 August 2026 07:26:44 Lease Expires . . . . . . . . . . : 13 August 2026 16:30:39 Default Gateway . . . . . . . . . : 192.168.1.1 DHCP Server . . . . . . . . . . . : 192.168.1.1 DNS Servers . . . . . . . . . . . : 192.168.1.1 8.8.8.8There may be multiple blocks output, one per network device.
- Find the ‘DNS Servers’ line for each network card. In the example above, the DNS servers configured are
192.168.1.1(our primary DNS server) and8.8.8.8(our secondary DNS server).
How to Find Your DNS Server IP Address on Mac
The best way to find your DNS address on macOS devices is as follows:
- Open the Terminal by pressing Command Key + Space Bar.
- Type
terminaland press ‘Enter’. - Type
scutil --dns | grep nameserverand press ‘Enter’. - You’ll see results that look like:
nameserver[0] : 192.168.1.1
You may see multiple entries.
This lists all the DNS servers that are currently in use by the system, including any overrides set by VPNs or other software.
In many home networking configurations, you will likely see an IP address starting 192.168.X.X or 10.X.X.X, as in our example above. This will be your router’s IP address on your local network.
Your router’s IP address may differ from our tool’s DNS test results, which display the public IP address of the DNS resolvers that contacted our test platform.
That’s expected. It means the DNS server on your router has contacted one or more upstream DNS server(s), forwarding your request. Our DNS checker tool displays the details of these upstream servers.
How to Find Your Router’s DNS Server Address
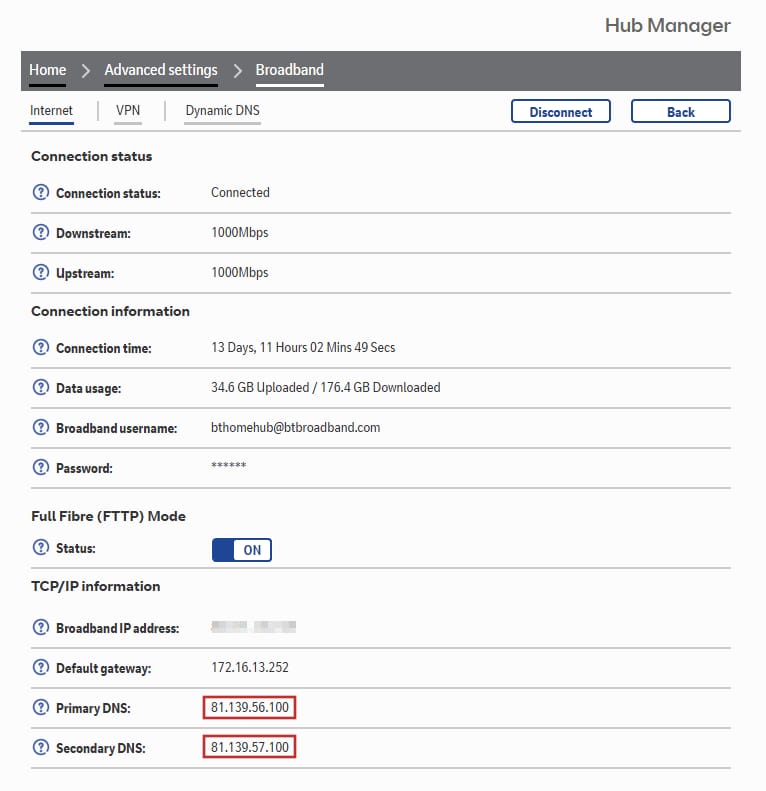
The best way to check the DNS server addresses your router is using is by checking your router’s status page.
Follow the three steps below to see which DNS server address(es) your router is using:
- Open your web browser and type the router’s IP address in the address bar. Often, the router’s IP address is 192.168.1.1. If it’s not, consult this helpful router IP address guide.
- Your router will likely ask you for a username and password before showing you its status. You can typically find these on the underside of the router.
- Look for a section called ‘Status’, ‘WAN’, ‘internet’, or ‘Connection’ – the label varies between manufacturers. The DNS servers your router is using will be listed there.

Finding a router’s DNS server address by logging into its status page.
How Do I Change My DNS Server?
By default, your DNS server is usually the one Your Internet service provider (ISP) hands out when your router connects.
However, there are three key ways to change which DNS server your device uses:
- Use a virtual private network (VPN) to use the VPN service’s DNS servers. The best VPNs run their own DNS resolvers, and will automatically change your system to query these, preventing DNS leaks. Our leak test checks this.
- Configure your DNS server in the Network Settings of your Operating System.
- Or, Change your DNS settings on your home or office router. This effectively changes the DNS settings of all devices connected to that router.
DNS queries are fundamental to how the modern internet works. But, as with anything sent to third parties, DNS queries can be logged and stored by DNS servers. This can leave a trail of your internet activity, vulnerable to misuse.
If you want to hide your devices’ DNS activity and avoid it being logged, then using VPN software is by far the best way. To find out more, read our guide explaining the differences between DNS, Smart DNS, and VPN services.
Free Public DNS Servers Recommendations
If you want your devices to use good quality DNS servers, here are some of the best free DNS servers available to the public:
Using the DNS servers above could improve DNS lookup times, and therefore increase your web browsing speed.
There’s one important point to note, however: All of the addresses above use standard, unencrypted DNS. For example, using 8.8.8.8 in your settings changes who answers your queries, but your ISP can still see every domain you look up, and they know who you are.
To easily hide your activity, make sure you use a VPN.
FAQs
Does changing my DNS server hide my browsing from my ISP?
No. Switching to 8.8.8.8 to 1.1.1.1 changes who answers your queries, but it doesn’t encrypt them. Standard DNS is sent in cleartext, so your ISP can still see every domain you look up, and so can anyone else on the network.
To actually hide it, you need encrypted DNS (DoH or DoT), or a VPN, which encrypts your DNS queries along with the rest of your traffic.
Is it safe to use a free public DNS server?
From a well-known provider, generally yes. But as always with free, there’s a trade-off.
These services see every domain you look up, so their logging policy matters more than their speed. Quad9 is run by a Swiss non-profit and blocks known-malicious domains by default. Cloudflare publishes independent audits of its data retention. Google retains more, for longer.
What you want to avoid is a DNS server you didn’t choose and don’t recognise, which is exactly what this tool is designed to help you catch.
What is a DNS leak, and how do I check for one?
A DNS leak is when your DNS queries escape your VPN tunnel and go through your ISP’s servers instead of your VPN’s. Your connection looks encrypted, but your ISP can still see every site you visit.
The quick check: connect your VPN, and then run the tool at the top of this page. The ISP column should show your VPN provider, or whatever you’ve manually set. If it shows your ISP instead, you have a leak. For a full check, use our leak test tool.