Top10VPN is editorially independent. Buying a VPN through our links supports our work.
What Are VPN Leaks and How Do You Fix Them?


Overview
A VPN leak can expose your IP address, DNS requests, and browsing activity to your ISP or anyone else monitoring your internet connection, putting your internet privacy at risk. I’ve put together this guide to help you find out how to check for VPN leaks such as DNS, IPv6 and WebRTC, and what you can do to stop them to secure your internet traffic.

Your VPN could be leaking your IP address, DNS requests, or location right now, and you wouldn’t know it without running a leak test.
Even if your VPN has a strict no-logging policy and is based in a privacy-friendly jurisdiction, I’ve tested plenty of apps that expose the very traffic they promise to protect.
Summary: VPN Leaks Explained
- A VPN leak is a security flaw that can expose your real IP address or online activity. Leaks are most common in low-quality VPN services, but incorrect configuration causes plenty of them too.
- The data leaked most often by VPN services are your IP address, DNS requests, and your WebRTC data.
- You can find out whether you’re affected in about a minute by running our VPN leak test tool.
- If your VPN leaks repeatedly, follow the fixes in this guide, or switch to a better VPN.
We’re fully independent and have been reviewing VPNs since 2016. Our advice is based on our own testing results and is unaffected by financial incentives. Learn who we are and how we test VPNs.
This content is also available as a video, if you prefer that format:

What Are VPN Leaks?
A VPN leak is a security flaw that exposes your IP address, DNS requests, or other personally identifying information to any third party monitoring your internet connection.
When a VPN is described as “leaking,” it means that a portion of your traffic is traveling outside the encrypted tunnel, failing to hide your public IP address and encrypt your internet traffic. That’s a fundamental failure, because it exposes your identity and internet activity.
In my own testing, I’ve found DNS leaks are by far the most common problem I run into, but IP address leaks (including IPv6 leaks) and WebRTC leaks all turn up regularly.
To find whether your VPN is letting you down, run an IP leak test. If you just want to confirm it’s doing the basics, check whether it has actually changed your IP address.
Let’s start with the three types of leak I see most often. There’s a fourth issue to watch out for – HTML5 geolocation – and I cover how to fix that further down.
IP Address Leaks
An IP (Internet Protocol) address identifies devices connected to the internet or a local network, allowing them to find and communicate with one another.
IP addresses also give away a device’s approximate geographical location.
An IP leak occurs when your VPN fails to mask your real public IP address with one of its own. It’s a serious privacy risk, as any websites you visit will be able to see your true location and potentially identify you.
There are two types of IP address, IPv4 and IPv6, and either can leak.
IPv4 leaks are much less common than IPv6 leaks. In fact our Android VPN security research shows that 15% of free Android VPNs tested leaked IPv6 compared to just 3% for IPv4.
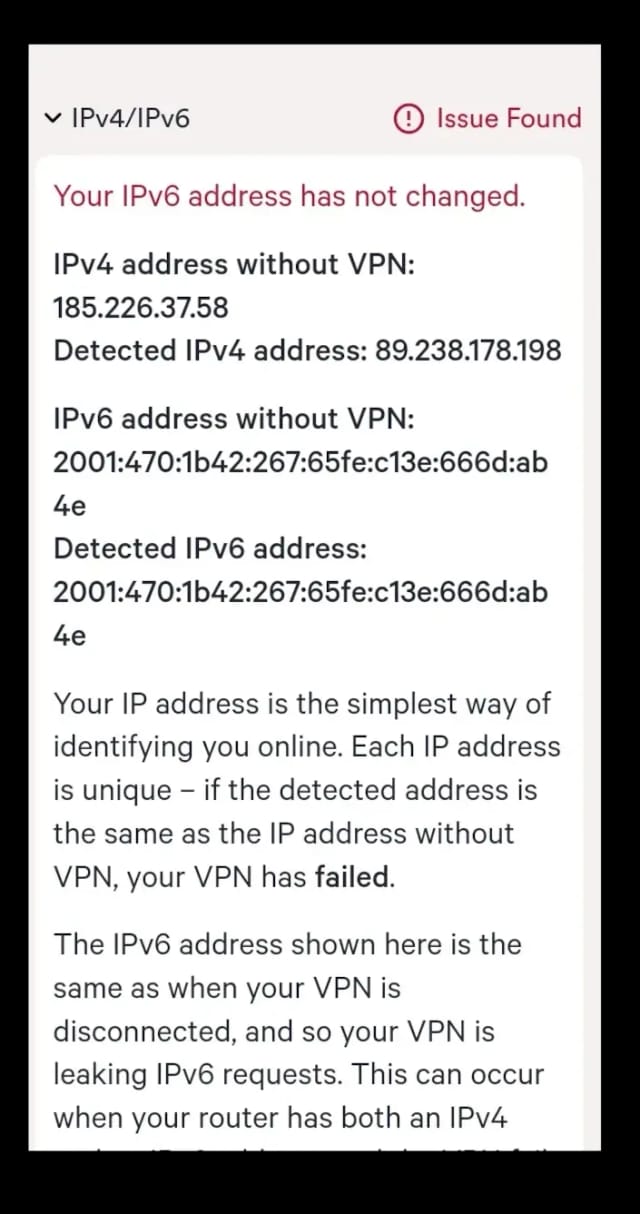
uVPN leaked my IPv6 address in our leak test tool.
Unless your VPN software has built-in IPv6 leak protection, the only reliable fix is to disable IPv6 traffic – either on your device or on your router. Neither is possible at the system level on iOS or Android, which is why I won’t recommend a mobile VPN app that leaks IPv6.
IPv6 leaks are equally as dangerous as IPv4 leaks. Websites still see your real location, and your ISP can track your browsing history.
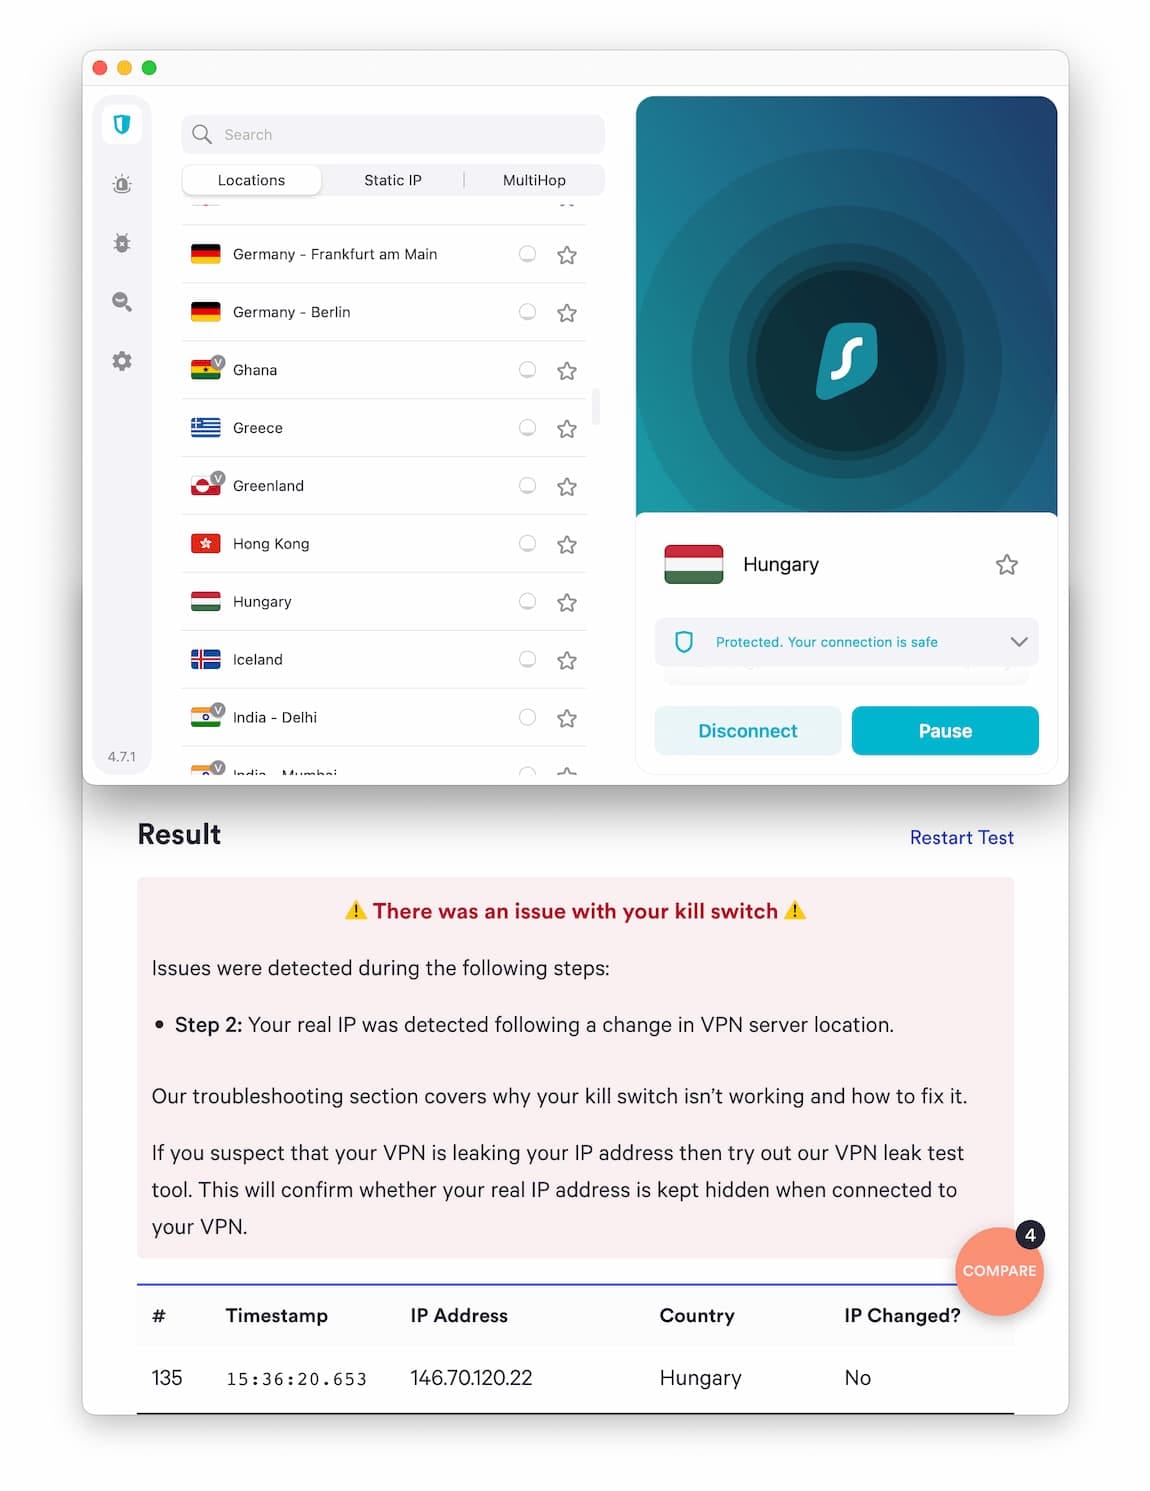
Surfshark’s kill switch didn’t stop my IP address leaking when I changed servers on macOS.
A premium VPN should include a kill switch to protect your IP address if your connection unexpectedly drops. That safety net is less reliable than it sounds though – when I ran our VPN kill switch tests, many top-tier services still leaked my IP address when I switched servers mid-session.
DNS Leaks
DNS (Domain Name System) is often described as the phonebook of the internet. It translates domain names into IP addresses which a browser needs to load websites and other online resources.
Every time you visit a website, your browser follows a sequence of steps in order to request the page you want to view. It first sends a query to a DNS server, which looks up the IP address associated with the domain name of the website. Your browser then contacts that IP address and requests the site.
The same thing happens when you open Netflix, or any other app that connects to the internet.
Normally, your ISP’s DNS servers handle this, and they often log every request alongside your IP address.
A VPN is supposed to encrypt your DNS queries and route them to its own private DNS servers.
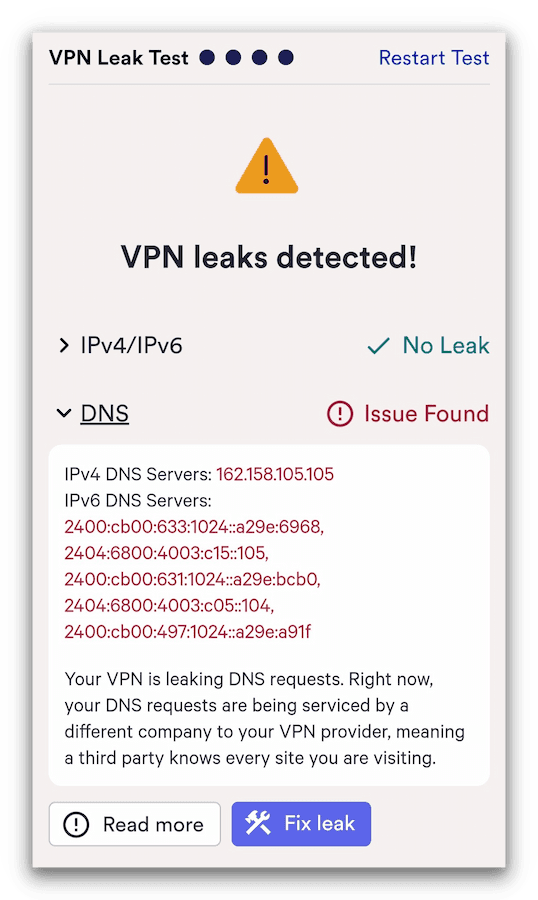
SuperVPN leaked my DNS requests as soon as I connected.
The most common DNS leak I find is a VPN that simply never reroutes the DNS requests – leaving them with your ISP’s default DNS servers, or handing them to another third party without your consent.
To see which servers your device is using, run our DNS server test.
Many VPNs will use DNS servers operated by Google, Cloudflare or OpenDNS by default. Over half (57%) of free Android VPNs tested in-house did exactly that.
Consent is the thing that matters here. Pointing your own DNS at a public resolver is a legitimate fix, and I recommend it later in this guide. What I object to is a VPN silently defaulting to it, because you end up putting your trust in a company you never chose – while paying for private DNS servers you aren’t actually using.
Worse still, some VPNs leak DNS requests outside of the tunnel entirely, leaving them exposed to your ISP or anyone else monitoring your internet traffic.
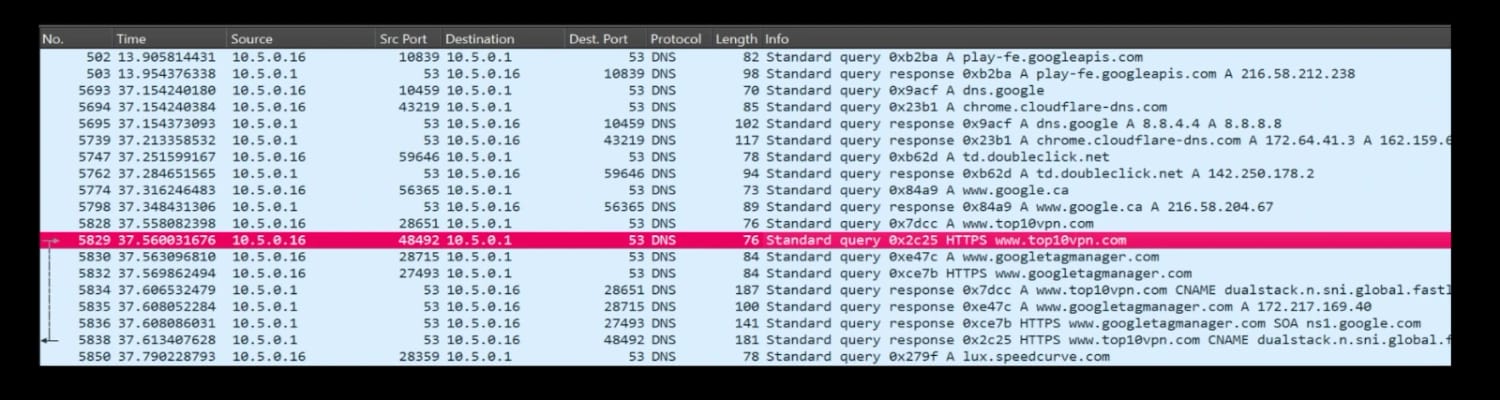
Wireshark capture of network traffic from Private VPN, showing DNS requests leaking outside the tunnel.
That’s what the Wireshark capture above shows – the Private VPN Android app leaking DNS requests for the Top10VPN website in plain sight. 9% of the free Android VPNs my team tested exposed DNS requests this way.
Look closely at the capture and you’ll also see a stream of DNS requests for ad-tracking domains, such as td.doubleclick.net. Most of the free Android VPNs we tested leaked requests like these. They reveal nothing about you personally, but I treat them as a reliable tell that an app is improperly configured and not completely trustworthy.
DNS leaks also leave you more exposed to DNS poisoning, where an attacker manipulates DNS responses to redirect you to malicious websites or intercept your traffic.
Why do DNS leaks happen?
- VPN service issues: some VPNs may have misconfigured DNS settings at their end, or they don’t operate their own DNS servers at all.
- Incorrect user settings: software updates or manual changes to your network settings can leave your device using the wrong DNS servers.
- Third-party software: other apps installed on your device may alter your DNS settings without you realizing.
- ISP DNS redirection: your ISP may be redirecting DNS queries, bypassing your preferred configuration.
- Malware: malware can change your device’s DNS settings and redirect DNS queries to malicious servers.
- DNS spoofing: An attacker can intercept DNS queries and return false responses.
WebRTC Leaks
WebRTC (Web Real-Time Communication) is an open-source technology that allows web browsers and mobile apps to communicate in real-time. It’s the tech that powers video conferencing, voice calling, and peer-to-peer file sharing without plugins or additional software.
It’s enabled by default in popular browsers such as Chrome, Firefox, and Safari.
A WebRTC leak happens when a VPN fails to stop your IP address and other identifying information from being exposed to websites and third parties. It’s a side effect of the way WebRTC negotiates direct peer-to-peer connections, which is also why it’s as much a browser problem as a VPN one.
Almost one in five (18%) of free Android VPNs we tested leaked through WebRTC.
Which VPN Services Leak Data?
My team and I have tested every one of the 59 VPNs in our review library for IP, DNS, and WebRTC leaks – every service, on every platform it supports.
Some of the most-downloaded VPNs on the Apple and Google app stores leak user data through DNS or WebRTC. The table below lists the most popular leak offenders.
*Leaks detected during testing of Chrome extension.
My team has also recently tested 100 of the most popular free Android VPNs, and the results were worse than expected: 88 of them were leaking. DNS leaks were the most common, exposing the internet traffic of 83 VPN apps, and 17 apps leaked in more than one way.

Donut chart showing percentage of free Android VPN apps affected by different types of VPN Leaks.
For the full breakdown of the 100 most popular free Android VPNs and how they performed in our security tests, read our Free Android VPN Security Flaws research report.
How to Fix VPN Leaks (IP, DNS, WebRTC, and More)
If you care about your privacy, choosing a VPN that doesn’t leak in the first place is the simplest and most important decision you can make.
That said, not every leak means starting over. If you’ve tested your VPN and found a problem, you can work through the fixes below.
1. How to Fix IP Address Leaks
How you fix an IP leak depends on which type of IP address is leaking. A genuine IPv4 leak usually means it’s time to change provider, but there are a few things you should check before making the switch.
IPv6 leaks, however, can usually be resolved in your device’s settings.
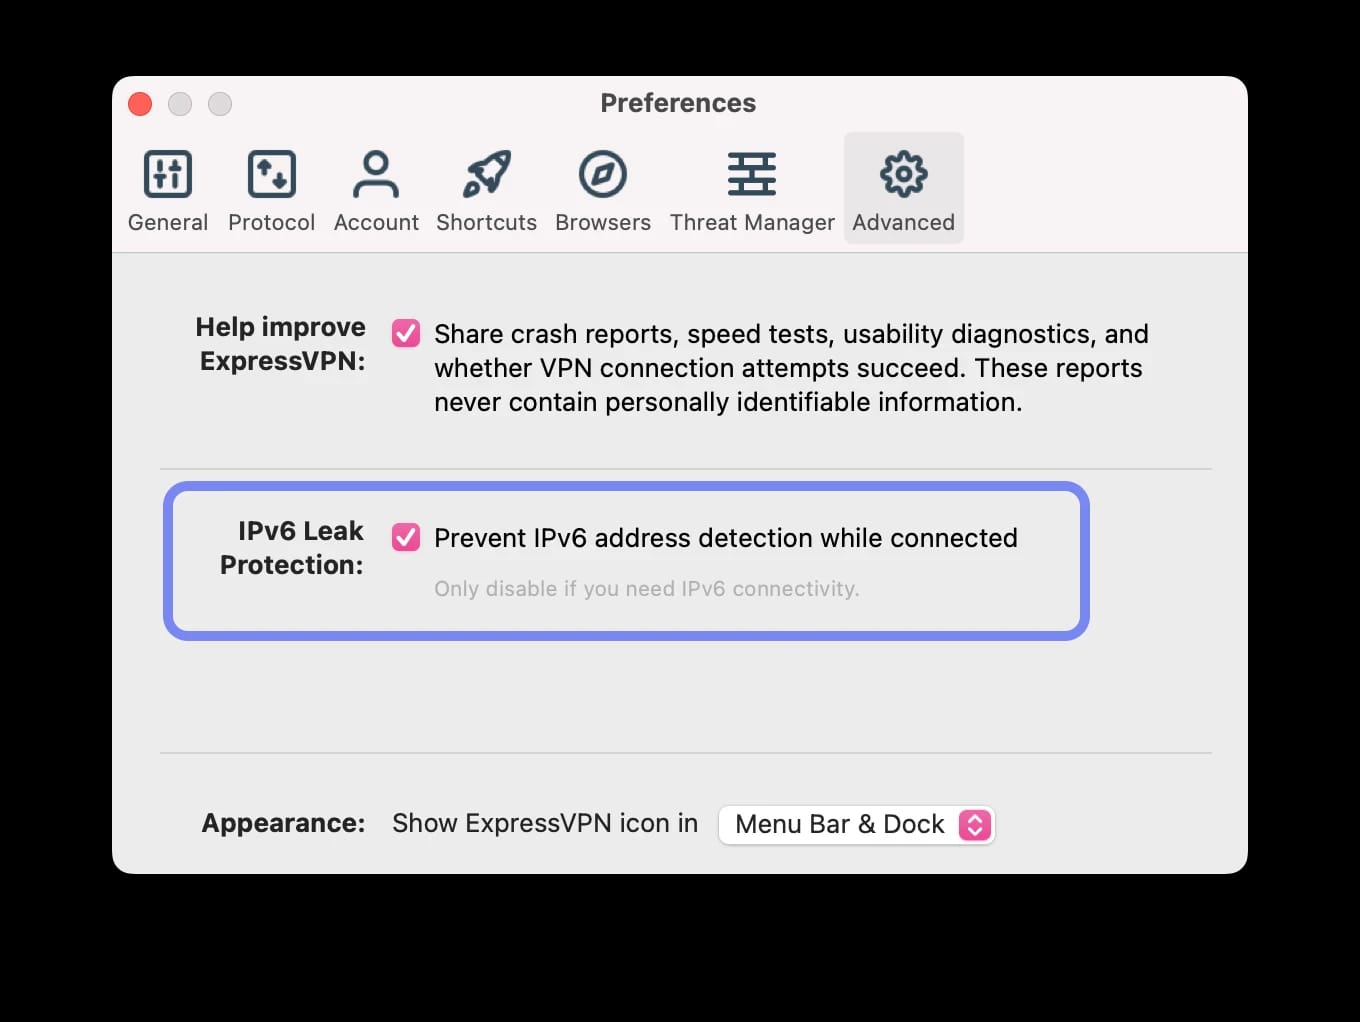
ExpressVPN offers IPv6 Leak Protection in its Advanced Settings.
How to Fix IPv4 Leaks
- Disconnect and reconnect to your VPN. Make sure the VPN is turned on.
- Ensure your web browser isn’t being inadvertently split-tunneled by your VPN.
- Open a new browser window and check your IP address.
- If your real IPv4 address is still showing, try the following steps before switching VPN providers:
- Ensure your VPN software is up to date.
- Check for any software conflicts, such as another VPN or a proxy service running at the same time.
- Contact your VPN provider’s support team for assistance.
How to Fix IPv6 Leaks
If you’ve been assigned an IPv4 address and don’t have an IPv6 address, you don’t need to worry about IPv6 leaks.
If you do have an IPv6 address and your VPN is leaking it, work through these steps:
- Make sure that your VPN is turned on.
- Ensure your web browser isn’t being split-tunneled by your VPN.
- Make sure you are using a VPN protocol that handles IPv6 traffic, such as WireGuard or properly configured OpenVPN.
- Check your VPN’s settings menu for ‘IPv6 Leak Protection’ and ensure that it is enabled.
- Open up a new browser window and check your IP address.
- If your real IPv6 address is still showing, you have two options: switch to a VPN that blocks IPv6 properly, or disable IPv6 yourself on your device or on your router.
How to Disable IPv6 on Different Devices
Most premium VPNs now either support IPv6 or block it outright, and ExpressVPN’s Advanced Settings are a good example of what to look for. If your current VPN does neither, you’ll need to disable IPv6 traffic yourself and fall back to IPv4.
How to Disable IPv6 on Windows 11
- Right-click the ‘Network’ or ‘Wi-Fi’ icon in your system tray and select ‘Network and Internet settings’.
- Click ‘Advanced network settings’.
- Under ‘Related settings’, click ‘More network adapter options’.
- Right-click your current internet adapter and select ‘Properties’.
- In the ‘Networking’ tab, uncheck ‘Internet Protocol Version 6 (TCP/IPv6)’, click ‘OK’, and restart your computer.
- After rebooting, verify that IPv6 is no longer leaking.
How to Disable IPv6 on Windows 10
The steps for Windows 10 are almost identical to Windows 11, although a few of the option names differ.
At step 3, for example, look for ‘Change Adapter Options’ rather than ‘More network adapter options’.
How to Disable IPv6 on macOS
There are two ways to disable IPv6 on macOS:
- Via System Settings:
- Open ‘System Settings’ (or ‘System Preferences’ on older versions) from the Apple menu.
- Click ‘Network’, select your network connection, and click ‘Advanced’.
- In the ‘TCP/IP’ tab, set ‘Configure IPv6’ to ‘Off’ or ‘Link-local only’.
- Click ‘OK’ to apply the changes.
- Using Terminal:
- Open ‘Terminal’ from ‘Applications’ > ‘Utilities’.
- List network interfaces:
networksetup -listallnetworkservices - Disable IPv6 for Wi-Fi:
networksetup -setv6off Wi-Fi - Disable IPv6 for Ethernet:
networksetup -setv6off Ethernet - Changes take effect immediately. Check for IPv6 leaks.
- To re-enable IPv6, use:
networksetup -setv6automatic Wi-Fiornetworksetup -setv6automatic Ethernet
How to Disable IPv6 on iOS or Android
You can’t disable IPv6 on iPhone, iPad, or Android devices at the system level. If your VPN app isn’t preventing IPv6 leaks on mobile, switching to a more secure VPN is your only real option.
How to Disable IPv6 on Your Router
Disabling IPv6 at the router protects all devices on your network at once. The exact steps for disabling IPv6 depend on the router’s brand, but the general process is:
- Type
192.168.0.1(or192.168.1.1) into your browser’s address bar to load your router’s admin panel. - Log in using your credentials, which are usually printed on the underside of the router.
- Navigate to your advanced settings.
- Locate and disable IPv6 traffic.
- Save your changes.
If your current router doesn’t let you disable IPv6, it’s worth replacing it with one that does. You’ll get more control over your network settings and close off IPv6 leaks for good.
2. How to Fix DNS Leaks
Your VPN could be leaking DNS requests for several reasons, but the most common causes are simple to fix.
Start by working out if you’re looking at a real leak. If you’ve manually pointed your device’s DNS at a third-party service like Google’s, a leak warning is expected rather than alarming – you chose that DNS resolver. Use our DNS server test to confirm your device is using the servers you picked.
If you haven’t changed anything and your device still uses your ISP’s default servers with your VPN connected, that’s a genuine leak.
The most effective fix is to switch to a VPN service that runs its own zero-log DNS servers. This keeps your queries inside the VPN tunnel and out of any third-party’s hands.
If you’d rather not change VPN provider, the workarounds below will at least stop your ISP from seeing your queries.
Change Your DNS Settings
If your VPN doesn’t automatically route DNS to its own private servers, you’ll need to manually point your DNS to a third-party DNS resolver.
Choose one that doesn’t reveal your true location – Google Public DNS and OpenDNS both qualify. There’s a trade-off though – you’re moving your DNS queries from your ISP to another company. That’s only an improvement because you’re the one making a choice.
Here’s how:
How to Change Your DNS Settings on Windows 11
- Right-click the Network or Wi-Fi icon in your system tray and click Settings.
- Click on your current network (Wi-Fi or Ethernet).
- Scroll down and click Hardware properties.
- Click on your internet adapter, then click Properties.
- Select Internet Protocol Version 4 (TCP/IPv4) and click Properties.
- Click Use the following DNS server addresses.
- Enter
8.8.8.8for Preferred DNS server and8.8.4.4for Alternative DNS server to use Google’s DNS. - For IPv6-compatible routers, repeat steps 5-7 for Internet Protocol Version 6 (TCP/IPv6).
- Check your DNS address with your VPN on to confirm your DNS servers have changed.
How to Change Your DNS Settings on Windows 10
The first few steps differ slightly from Windows 11:
- Right-click the Network or Wi-Fi icon in your system tray and click Open Network & Internet settings.
- Select Change adapter options.
- Find the adapter you’re currently using to connect to the internet, right-click it, then click Properties.
- Continue from step 5 above.
How to Change Your DNS Settings on macOS
- Open System Settings (System Preferences on older versions), then select Network.
- Select the adapter currently in use (indicated by a green dot), then click Advanced.
- Click the DNS tab, then click the + icon in the bottom-left corner.
- Enter
8.8.8.8and press Enter to replace the default DNS server. - Click the + icon again, enter
8.8.4.4, and press Enter to finish switching your DNS to Google’s. - Check your DNS address with your VPN on to confirm your DNS servers have changed.
How to Change Your DNS Settings on iOS Devices
- Open the Settings app.
- Tap Wi-Fi, then tap the i symbol next to the connected network.
- Scroll to the DNS section, tap Configure DNS, then tap Manual > Add Server. Enter
8.8.8.8,8.8.4.4, and tap Save. - Check your DNS address to ensure the changes have taken effect.
How to Change Your DNS Settings on Android Devices
- Open the Settings app.
- Tap Connections > More connection settings > Private DNS.
- Check the box next to ‘Private DNS provider hostname’, type
dns.googlein the field below, and tap Save. - Check your DNS address to ensure the changes are working properly.
How to Block a Transparent DNS Proxy in OpenVPN
Some ISPs run a transparent DNS proxy that intercepts and redirects DNS traffic to their own servers.
Transparent DNS proxies effectively ‘force’ a DNS leak without telling you. Most leak detection tools, including ours, report them in the same way as an ordinary DNS leak.
Recent versions of the OpenVPN protocol have a simple method to tackle this problem, so update to the latest version of your OpenVPN client before you start. If your VPN doesn’t support it, or is stuck on an older build of the protocol, I’d take that as a good reason to switch your service. The following directive only works on Windows.
- Find the .ovpn or .conf file for the server you’re trying to connect to. For more information, read the OpenVPN manual.
- Open the file in an editing program like Notepad and add
block-outside-dnsto the bottom. - Rerun a DNS leak test to check if the leak is resolved and find any additional issues.
Most premium VPN services handle transparent proxies for you. If you’re not sure if yours does, ask its support team.
Disable Teredo
Teredo is a built-in Windows feature designed to help IPv4 and IPv6 coexist, by carrying IPv6 traffic over IPv4 connections.
However, because Teredo is a tunneling protocol in its own right, it can sometimes take priority over your VPN’s encrypted tunnel and push traffic outside it.
Here’s how to disable Teredo on Windows devices:
- Open Command Prompt and type
netsh interface teredo set state disabled. - Press Enter to disable Teredo.
- Rerun a DNS leak test to confirm the leak is resolved and catch any remaining issues.
You might experience occasional issues with certain websites or servers once Teredo is disabled, but in my experience that’s a small price for closing off a whole class of leak.
3. How to Fix WebRTC Leaks
WebRTC leaks are primarily a browser issue, and fixing them may require more than just choosing a good VPN.
Start with your VPN: if it offers a ‘Disable WebRTC’ feature in its browser extension, turn it on. It’s the least disruptive fix, and in my testing it’s usually enough on its own.
If it doesn’t, you’ll need to disable WebRTC in your browser settings. Here’s how to do it, browser by browser:
Limiting WebRTC Leaks in Chrome or Edge
Neither Chrome nor Edge gives you an off switch for WebRTC. Consider this when you need your IP address hidden.
- Install an extension such as WebRTC Leak Prevent or uBlock Origin to restrict what WebRTC can expose.
- For a proper fix, switch to a browser that allows WebRTC disabling outright.
How to Disable WebRTC in Mozilla Firefox
- Type
about:configin the address bar and click Accept the Risk and Continue. - Toggle
media.peerconnection.enabledto false. - Retest for WebRTC leaks to make sure the issue is resolved.
How to Disable WebRTC in Safari
- Enable Show Develop menu in menu bar in the Advanced settings
- In the Develop menu, uncheck Enable Legacy WebRTC API if it’s listed.
- Retest for leaks. Bear in mind this only covers the legacy API – Safari has no switch for modern WebRTC, so check the results carefully.
How to Disable WebRTC in Opera
- Go to Settings > Advanced > Privacy & security.
- Check Disable non-proxied UDP in the WebRTC section and save your changes.
- Retest for leaks.
How to Disable WebRTC in Brave
- Set Fingerprinting Blocking to Strict, may break sites in Settings > Shields.
- Change WebRTC IP Handling Policy to Disable Non-Proxied UDP in Additional Settings > Privacy and security.
- Retest for leaks.
How to Fix HTML5 Geolocation Leaks
If your real location is still visible on the map after a leak test, there are two possibilities. One is that your public IPv4 or IPv6 address is still leaking – fix that using the steps above.
If the problem persists, HTML5 geolocation is almost certainly revealing your true location.
This is the one leak where a VPN genuinely can’t provide cover, because HTML5 geolocation works out where you are from signals that have nothing to do with your IP address: nearby Wi-Fi hotspots, cell tower triangulation, and GPS on mobile devices.
It’s also calculated and reported by the browser. Therefore, to fix these location leaks, you have to shut it off in the browser. Disable HTML5 geolocation, or use a browser extension with built-in geolocation protection – ExpressVPN’s is the one that’s given me the most consistent results, available as a Chrome Extension and Firefox Add-on.
Here’s how to disable HTML5 geolocation in popular web browsers. Clear your cache, cookies, and history afterward, or permissions you’ve already granted can survive the change.
How to Disable HTML5 Geolocation in Google Chrome
- In Chrome, go to Settings > Privacy and security > Site settings.
- Under Permissions, click Location.
- Select Don’t allow sites to see your location.
If you’d rather decide site by site, choose Sites can ask for your location instead and Expand all requests. This keeps geolocation available, but puts you in control of every request.
How to Disable HTML5 Geolocation in Mozilla Firefox
- Type
about:configinto the Firefox address bar and click Accept the Risk and Continue. - Type
geo.enabledinto the search bar. - Double click the row labeled
geo.enabledand set it to Deny for all websites.
How to Disable HTML5 Geolocation in Safari
- Go to Settings (Preferences on older versions) > Privacy, and check Prevent Cross-site tracking.
- In the Websites tab, select Location and set it to Deny for all websites.
How to Disable HTML5 Geolocation in Microsoft Edge
- Open Edge, type
edge://settings/content/locationinto the address bar, and press Enter. - Turn off Ask before accessing to block location requests.
- For good measure, on Windows:
- Press Win + I.
- Go to Privacy & security > Location.
- Turn off Let apps access your location.
- Under Location history, click Clear.
How to Disable HTML5 Geolocation in Opera
- Type
opera://settings/content/locationinto the address bar and press Enter. - Turn off Ask before accessing (recommended) to block location requests.
How to Disable Flash
Flash reached end of life on December 31, 2020. Adobe blocks it from running, and every major browser has removed support, so there’s nothing left to disable in an up-to-date browser.
If our test still flags Flash, you’re running a legacy browser build. Updating it will fix the Flash issue, and will close off a long list of other security holes in your browser at the same time.
Google Chrome
Flash is now disabled by default in the latest version of Chrome, and the setting has been removed entirely, so there’s nothing to do.
On a legacy build of Chrome that still exposes the option, block it by following these steps:
- Open the Chrome menu and go to Settings > Privacy and security.
- Click Site Settings > Flash.
- Ensure Block sites from running Flash is selected.
Mozilla Firefox
On a legacy build of Firefox, follow these steps:
- Open the Firefox menu and select Add-ons > Plugins.
- Look for Shockwave Flash and select Never Activate.
If Shockwave Flash isn’t listed, there’s nothing to worry about – your version of Firefox has already dropped support.
How to Fix a Data Center IP
If a website identifies your IP address as belonging to a data center, that isn’t a leak – it’s a sign your VPN is working, and your real IP address is hidden. The only thing exposed is the fact you’re using a VPN.
IP addresses are classified by how they’re registered. Home and mobile connections are registered to consumer ISPs, so they’re labeled as residential.
VPN servers live in data centers, so their addresses are registered to hosting companies, which is what lookup services report.
This only becomes a problem when a site actively blocks VPN traffic. If that happens to you, don’t reach for the off switch. Try a different server first, then your VPN’s obfuscated (or ‘stealth’) mode, and then a dedicated IP address if your provider sells one.
Turning off your VPN will clear the data center flag, but it also hands your real IP address back to every site you visit.
How to Fix Torrent IP Leaks (TCP & UDP)
If you use a VPN while torrenting, it’s worth checking that your BitTorrent client isn’t leaking your IP address separately. Our Leak Tool test has a specific Torrent Leak Test option for this. I’ve seen these types of leak happen on setups where the VPN was working perfectly for browsing and for every other app.
Torrent IP leaks come from two sources: TCP and UDP – either protocol can be used when downloading a file via torrent. TCP leaks are the ones you’re realistically going to run into, so start there. The same three fixes also cover UDP.
How to Fix a Torrent TCP IP Leak
Solution 1: Restart Your BitTorrent Client and Re-add the Torrent File
A common cause of IP leaks when torrenting is starting the torrent before connecting to a VPN server. Remove any torrents, close your BitTorrent client, connect to a VPN server, re-add the torrent files, and retest once the VPN is connected and running.
Solution 2: Disable IPv6 or Enable IPv6 Protection
Some VPNs may only protect IPv4. If you have an IPv6 address, it can leak.
If your VPN has an ‘IPv6 Protection’ option, enable it. Failing that, look for a ‘Disable IPv6’ option, which blocks all IPv6 connections and rules out the leak entirely.
Solution 3: Deactivate Any Proxy Settings in the BitTorrent Client
If your BitTorrent client is set to proxy via another device on your local network, and that machine isn’t protected by your VPN, your IP address can leak.
Disable the proxy and retest. You’ll find proxy settings in your BitTorrent client’s connection settings menu.
How to Fix a Torrent UDP IP Leak
UDP leaks are highly uncommon, and all three fixes above apply to UDP unchanged.
One scenario they won’t cover is a VPN that doesn’t support UDP at all. If that’s the case, the only fix is to switch to a better VPN for torrenting.