Top10VPN is editorially independent. We may earn commissions if you buy a VPN via our links.

How to Change Your NAT Type

JP Jones is our CTO. He has over 25 years of software engineering and networking experience, and oversees all technical aspects of our VPN testing process.

Additional Research by Harry Ferrigno

A strict NAT Type can cause problems if you're trying to play multiplayer games. In this guide, we explain the different ways to change your NAT Type. Learn how to change your router settings and troubleshoot your connection problems.

Three doors indicating open, moderate, and strict NAT Types

Having a router with a strict NAT Type can ruin online gaming with poor matchmaking, restricted voice chat, and an unstable connection.

Fortunately, you can change your NAT Type to a less restrictive setting to allow for a better gameplay experience.

In this guide we explain exactly how to change your NAT Type for a variety of devices including PC, Xbox One and Xbox Series X|S, PS4, PS5, and Nintendo Switch.

We also explain UPnP, port forwarding, and how to use a VPN to change your NAT Type.

If you can access your router, we recommend enabling UPnP or manually forwarding your ports.

If you can’t access your router, we suggest creating a Windows 10 hotspot with a VPN installed.

How to Change your NAT Type through Your Router

Follow the instructions in this section if you have access to your router. You will need to have your IP address on hand as well as access to your router’s login credentials.

Your router’s login credentials will vary by manufacturer, but routerpasswords.com has a database covering the default for most modern routers.

Method 1: Use UPnP (Universal Plug and Play)

Pros Cons
Identical configuration for all devices Potential security risks
Simple and easy setup
Automatic once enabled

Universal Plug and Play is a type of autonomous port forwarding. It is the easiest way to change your NAT Type to Open on Xbox, PS4, PS5, Switch, and PC.

To enable UPnP, follow these steps:

  1. Type your IP address into your web browser’s address and press Enter. If you don’t know your IP address, use our ‘What Is My IP’ tool or find it on the back of your router. This will access your router settings.
  2. Fill in your login credentials. Unless you’ve changed these previously, your login is typically “admin” and your password is normally the same or left blank. This can vary by manufacturer, so check routerpasswords.com if you have difficulty logging in.
  3. Once you’ve logged into your router, find the UPnP settings. Depending on the manufacturer, this can usually be found under any variation of “Settings,” “Network Settings,” or “Advanced Settings.”
  4. Enable UPnP. Reset your router and your device to ensure that the change in settings is registered. Your NAT Type will no longer be strict.

How does UPnP work?

UPnP is a series of protocols that allow devices in the same network to discover and communicate with each other.

When enabled, your games consoles or PC will use UPnP to notify your router to open the required ports on your internet connection and forward them to your device. This allows a connection to be established between a device within your local network and your public-facing internet port.

In gaming terms, enabling UPnP means that the ports assigned to your gaming console or PC will automatically open upon request. This will give you an Open NAT Type on Xbox, PS4, PS5, Switch, and PC.

We’ve highlighted UPnP as the first solution you should try as it’s the easiest to setup. It does, however, carry some security risks. A device carrying malware inside your network could theoretically use UPnP to open a port for further exploitation by a third party. This is not common but is worth considering before enabling UPnP on your router.

Method 2: Use Port Forwarding

Pros Cons
Minimal security risk Overly-technical setup
Can choose specific ports to open instead of the entire network Configuration varies by manufacturer
Works on all devices

Your router contains ‘ports’ which function as virtual doors to the internet. NAT directs your internet traffic through these ports to its appropriate destination, whether it’s another device or website.

This is an automatic process, but problems can arise when NAT doesn’t open the right port for your connection.

Port forwarding is the process of manually assigning a port to a particular device which creates a direct connection.

This allows you to directly connect your games console to its required gaming network or launcher, thereby changing your NAT Type.

It also has the added benefit of improving your in-game latency, making port forwarding an essential feature for PUBG VPNs and gaming VPNs generally.

How to port forward your Xbox or PlayStation

  1. To access your router’s settings, type your IP address into your web browser’s address bar and press Enter. To find your IP address, use our IP checker tool or check the back of your router.
  2. Find your console’s IP. To do this on Xbox One and Xbox Series X|S, select Settings > Network > Network settings > Advanced settings > IP address . To do this on PlayStation 4 and 5, navigate to Settings > Network > View Connection Status .
  3. In your router’s settings, navigate to your router’s port forwarding menu (this will vary by manufacturer). This can be found under Security > Apps and Gaming > Port range Forwarding for Linksys routers, Advanced > Advanced setup > Port Forwarding for Netgear, and Advanced > Forwarding > Virtual Servers for TP-Link.
    Linksys Router Port Forwarding Menu

    The Port Forwarding menu of a Linksys router

    Here you’ll be asked to select one of three protocols (UDP, TCP, or both) and to fill in your start and end port number. Each entry will also require your console’s IP address.

  4. Enter the numbers in the tables below. Unless specified otherwise, repeat the same number for both the start and end port. If a port number is separated by a hyphen the first number represents the start port and the second number is the end port.

    If it’s supported by your router, we recommend selecting ‘both’ in the protocol section as this reduces the amount of port forwarding inputs you have to make.

  5. If you’re on Xbox, assign these ports:

    TCP UDP Both (Recommended)
    3074 88 3074
    500
    3074
    3544

    If you’re on PlayStation, assign these ports:

    TCP UDP Both (Recommended)
    1935 3074 1935
    3478-3480 3478-3479 3074
    3478-3480
  6. After you’ve added the required ports, save your changes and reset your router and console.
  7. You will now have an ‘Open’ NAT Type on Xbox and ‘Type 2’ on PlayStation.

How to port forward your Nintendo Switch

  1. The Nintendo support page recommends you manually set your own device IP. You’ll need your network IP address, Subnet Mask, and Default Gateway for this.
  2. If you’re using a windows device, go to Windows search bar and type cmd. Select Command Prompt, then type in ipcongifg/all and press Enter to view the required network information. If you’re using macOS go to System Preferences > Network. Select your active connection and then click Advanced. Locate the TCP/IP button and all the necessary information should appear.
  3. Once you have your network information go back to your Nintendo Switch. Navigate to System Settings > Internet > Internet Settings. Your Switch will now scan for an available network.
  4. Nintendo Switch System Settings

    Navigate to your Internet Settings

  5. Locate your network, then select Change Settings > IP Address Settings > Manual .
  6. Delete the pre-existing IP address by holding down the B button on your joycon or controller. Replace it with the IP address you found on your Windows or macOS device in Step 2.
    The Nintendo support page specifies that you should add 20 to the last digit of your IP address. For example an address that reads 192.0.2.1 should be input as 192.0.2.21
  7.  IP Address input menu on a Nintendo Switch

    Make sure you input your new IP address correctly

  8. Delete your Subnet Mask and Gateway by holding down the B button after selecting them. Input the network information you collected earlier. Unlike the IP address, you do not need to adjust any of the numbers.
  9. Select Save in the bottom right corner to register your changes.
  10. Log in to your router settings and navigate to the port forwarding tab
  11. Unusually, Nintendo suggests forwarding ports 1 through 65535. We strongly recommend that you do not do this, as doing so would expose your Switch to the entirety of the internet. Instead, we recommend forwarding ports 45000-65535.
  12. Input 45000 as the start port and 65535 as the end point on the UDP protocol and save your changes.
  13. Reset your router and console to register the changes. Your Switch will now have an Open to Moderate NAT Type (ranging from A to C).

How to port forward your PC or Mac

  1. Obtain your computer’s IP address. If you’re using Windows then type cmd into the Windows search bar and press Enter. Select Command Prompt, then type in ipconfig/all and press Enter to view the device IP.

    If you’re using macOS, go to System Preferences > Network and click on your connection, then Advanced. Locate the TCP/IP button and click on it to view the device IP.

  2. Log in to your router settings page.
  3. Navigate to the port forwarding section.
  4. Unlike on the games consoles, there are no set ports on a PC that work for all games.
    Typically, ports will vary depending on the game launcher used and can even differ on a game-by-game basis.
  5. We recommend referring to portforward.com for your PC game’s specific ports.
  6. Each port forwarding rule will also require your PC’s IP address from Step 1.
  7. Input the appropriate ports and save your changes.
  8. Reset your router and PC to register your changes.
  9. You should now have an Open NAT Type.

Why We Don’t Recommend Using DMZ to Change Your NAT Type

You may see other NAT Type troubleshooting guides suggest putting your games console into a ‘DMZ’ to open your NAT Type. This is a reckless ‘solution’ which will expose your gaming device to the entire internet.

A DMZ refers to a ‘Demilitarized Zone Network’. This is a miniature network which acts as a middle-man between a local private network, such as your home router and devices, and a wider public network – like the internet.

DMZs are typically used by organizations that want customers to access their website but don’t want to expose their private network to the internet. The company website would be put into a DMZ allowing the customers to publicly access it, while ensuring the organization’s servers remain private.

Putting your PC or games console into a DMZ will provide you with an Open NAT as it will open all your ports.

However, it will keep all of your ports open 24/7, leaving you extremely vulnerable to malware attacks such as ransomware and botnets. Moreover, despite the separation from your local network, a device in a DMZ can still communicate with devices in your LAN and therefore infect them.

How to Change your NAT Type without a Router

Method 1: Create a Hotspot with a VPN Installed

Pros Cons
Doesn’t require access to your router Only works for Windows 10 computers
Can easily be turned on and off by toggling the VPN Requires a gaming VPN subscription
Minimal security risk with VPN protection

Windows 10 lets you simulate your own virtual network by creating a hotspot. By installing a VPN, your hotspot becomes its own router, completely bypassing your physical router and its strict NAT type.

Through our own testing, we can confirm the Windows 10 hotspot consistently provides a Moderate NAT Type.

Moderate NAT Type on Xbox

We were able to change our strict NAT Type to moderate using a mobile hotspot.

As shown above, we used an Xbox VPN to change our NAT Type but this method works with all games consoles.

Creating a hotspot won’t technically change your router’s NAT Type, or prevent the network address translation from happening. NAT will still occur on a Windows 10 hotspot, but it will provide a Moderate NAT Type by default.

We cover creating a Windows hotspot with a VPN connection in-depth in our instructions for using ExpressVPN with Xbox consoles.

WARNING: Our testing has confirmed this is the case with Windows 10, but you may see different results when creating a hotspot on a different device or operating system.

To change your NAT Type using a VPN hotspot:

  1. Install a gaming VPN onto your Windows 10 computer – do not connect to a server yet. Based on our latest tests, we recommend ExpressVPN for gaming.
  2. Go to Settings > Network & Internet > Mobile Hotspot.
  3. Enable Mobile Hotspot and select to share your internet connection from Wi-fi.
  4. Go back to Network & Internet and select Change adapter options.
  5. Locate your VPN service and right-click on it. Select Properties.
  6. Go to the Sharing tab and select Allow other network users to connect through this computer’s internet connection.
  7. Click on the dropdown menu labelled Home networking connection and pick the hotspot you created earlier.
  8. Open up the VPN app you installed on your Windows computer and select your preferred server location.
  9. Then connect to the hotspot on your chosen gaming device to obtain a Moderate NAT Type.

Though most VPNs will work with this method, we strongly recommend choosing a top-rated VPN that minimizes lag and has servers in multiple global locations.

The best gaming VPNs offer fast international speeds, low latency, and excellent customer service. Their extensive server networks let you access nearby VPN servers regardless of where you’re located.

What Is a NAT Type?

Network Address Translation (NAT) is a process that takes the private IP address of devices on a local network and translates them into a single, public IP address for a wider network – usually the internet.

Your NAT Type is an indicator of your local network’s accessibility. NAT Types come in three categories: Open, Moderate, and Strict.

These three categories are dictated by your router’s NAT firewall, and interpreted by the manufacturer of the gaming console or PC you’re playing on. For example, an Open NAT Type on Xbox could be a Moderate one on PlayStation.

Here’s a table explaining the differences between each NAT Type:

NAT Type
Definition
Open No restrictions whatsoever. This normally means you’re connected directly to the internet without a router or that you have opened the necessary ports on your router.
Moderate Your device is behind a router. There’s sufficient ports open for a connection to be established.
Strict Your device is behind a router. The router cannot or will not forward incoming requests to your games console or PC.

Every device on a network is assigned an IP (Internet Protocol) address as a means of identification and communication with other devices. At the conception of the internet the IPv4 was developed on a 32-bit code which limits the amount of available IPs to around 4 billion.

Network Address Translation (NAT) was implemented to conserve the remaining unregistered IPs.

If your VPN uses outdated protocols incompatible with NAT, your router may block the connection. If this happens, you’ll need to set up a VPN passthrough to forward the VPN traffic through your router.

NAT Type Compatibility

Your NAT Type dictates the level of communication and connectivity you’re allowed while gaming online.

If your NAT Type is Open you are able to play and communicate with anyone online. If your NAT Type is Moderate you can only connect to Open and Moderate players. If you have a Strict NAT Type you can only talk and play with Open Type gamers.

The different compatibilities of NAT Types are outlined in the table below:

Matchmaking will take longer with a Strict NAT Type as you won’t be permitted to host matches and you can only join a game hosted by an Open NAT Type user. Furthermore, you will be blocked from matchmaking on games that use a peer-to-peer system to connect players.

Open NAT Types also present their own problems. By having your console connected directly to the internet you run the risk of malware entering your local network. The NAT firewall functions as your first line of defence by denying incoming information requests from potentially malicious sources.

By ‘opening’ your NAT, you lose this protection. That said, these types of attacks are rare, especially on consoles.

How to Check Your NAT Type?

This will vary depending on the manufacturer of your gaming console. On PC, the NAT Type changes on a game-by-game basis.

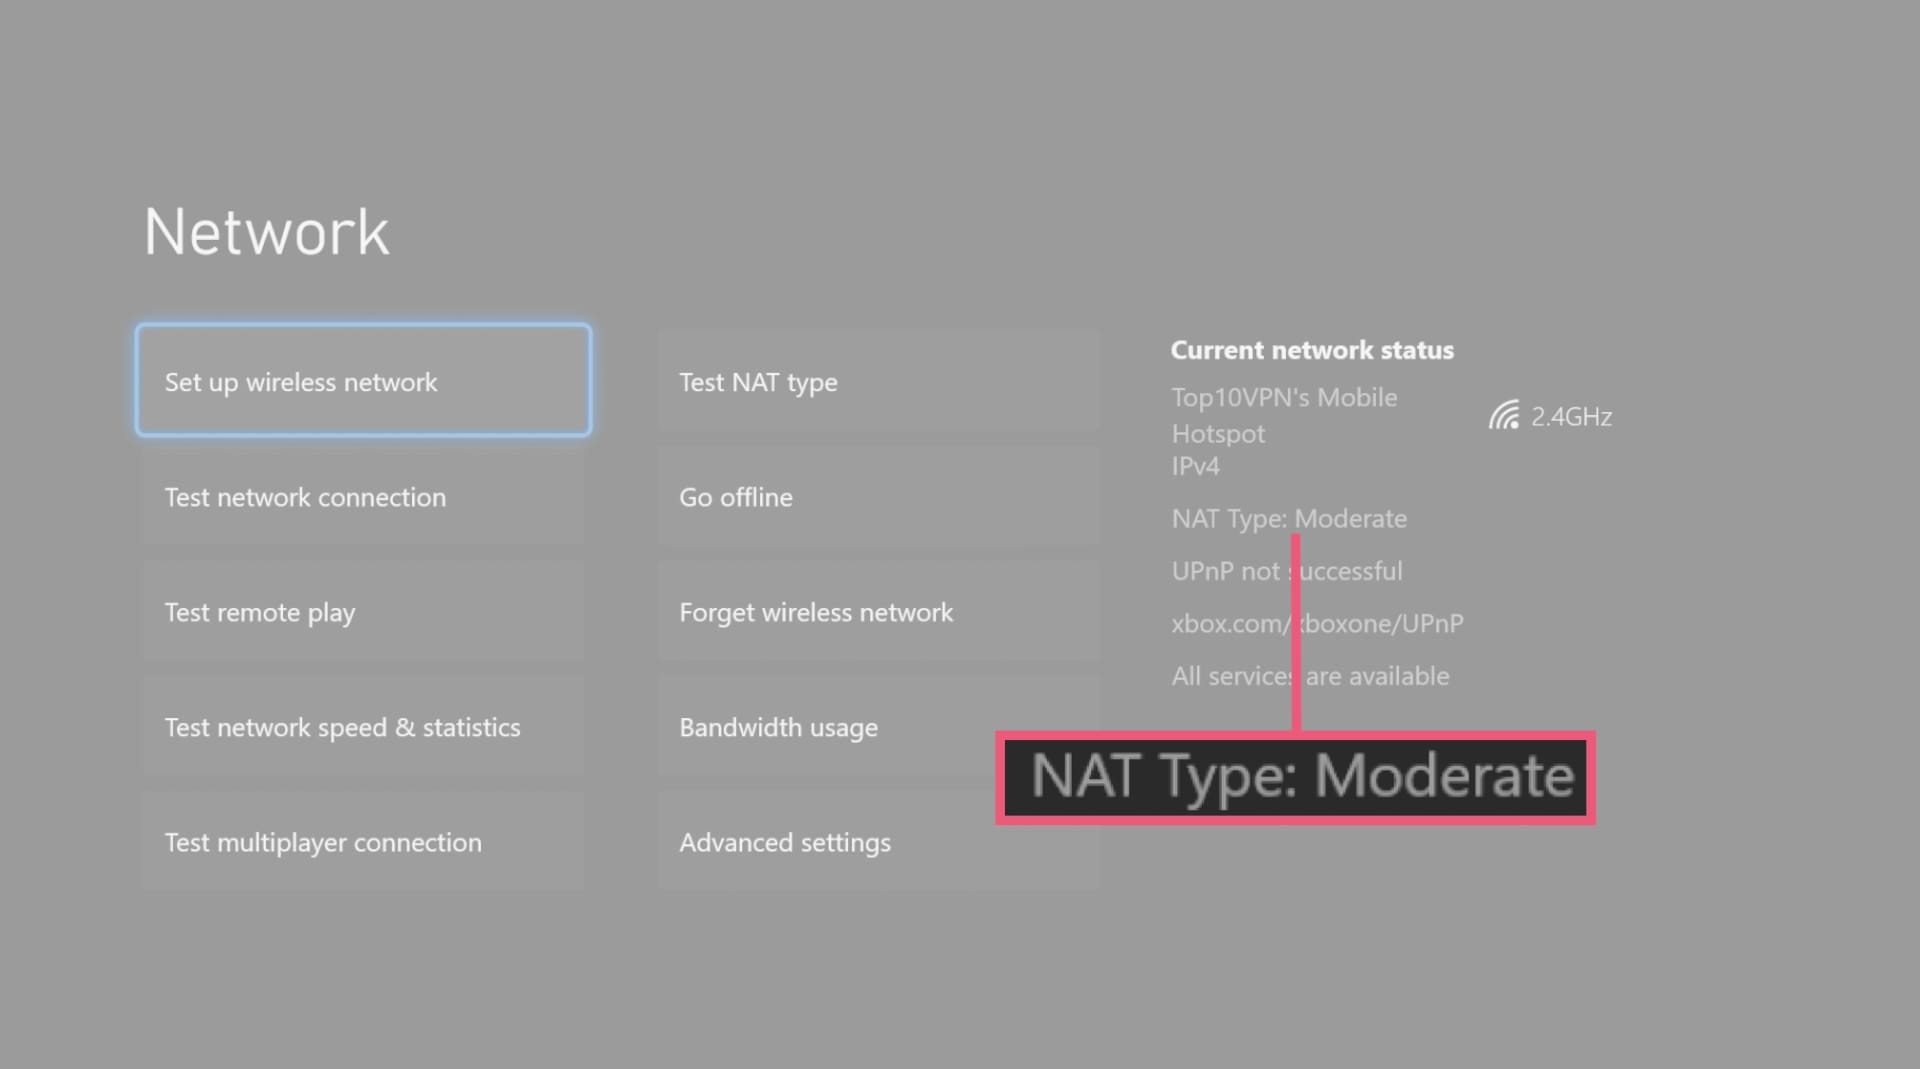
  • On Xbox, navigate to Profile & System > Settings > General > Network Settings and look under the Current Network Status heading.
  • On PlayStation, go to Settings > Network > View Connection Status and look at the bottom of the page.
  • On Nintendo Switch, select System Settings > Internet > Test Connection .

What Is NAT Type 2?

NAT Type 2 is Sony’s classification for Moderate NAT Types on the PlayStation 4 and 5.

This is the most common NAT Type on PlayStation as Sony only assigns an Open NAT Type if your console is directly connected to the internet.

This is not recommended as it would leave your PlayStation vulnerable to malware attacks and hacking attempts.

What Does NAT Type Failed Mean?

PS4 NAT Type error message

PlayStation’s NAT Type error message

“NAT Type failed” is Sony’s default message for any networking error on the PlayStation 4. Typically, this means that your router was unable to perform NAT on your PlayStation’s outgoing connection.

To fix the ‘NAT Type failed’ error message you can manually set up your PlayStation’s connection to the internet.

To do this, get your PS4 IP address by navigating to Settings > Network > View Connection Status.

Then obtain your network’s IP address, default gateway, subnet mask, and DNS Server. This can be found by searching cmd in a Windows device and selecting command prompt. Then type in ipconfig/all to view the necessary network information.

If you prefer macOS go to System Preferences > Network. Select your active connection and click Advanced. Locate the TCP/IP button and the required information should appear.

On your PS4, select Settings > Network > Set Up Internet Connection and choose Custom. Input all the information you collected in the previous steps.

You will now be assigned a NAT Type.

What Does ‘Teredo Is Unable to Qualify’ Mean?

This protocol is used to enable matchmaking on select Xbox exclusive games. If your PC can’t locate a Teredo IP address you will be told that “Teredo is Unable to Qualify” and your console will function as if it has a Strict NAT Type.

Xbox teredo error message

Microsoft’s NAT Type error message

To fix the Teredo error message, try reconfiguring the IP Helper Service on a Windows device.

To do this, type Services in the Windows search bar and navigate to Start-up Type > IP Helper > Start-up Type. Then enable Automatic.

Alternatively, update your router to the latest firmware to ensure that it’s not blocking IPv6 connections.