Top10VPN is editorially independent. We may earn commissions if you buy a VPN via our links.
How to Install and Use a VPN on Kodi
In This Guide
Installing a VPN on Kodi is essential for streaming securely and anonymously. In this step-by-step guide we’ll show you how to easily set up and use a VPN with Kodi on any device.
Quick Guide: How to Install a VPN on Kodi
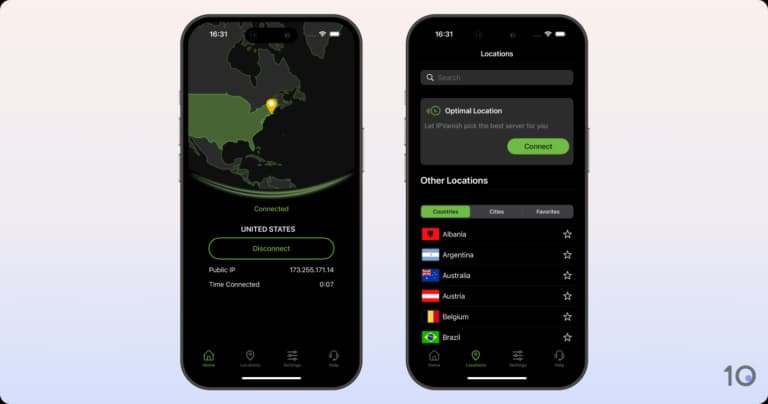
- Sign up to reputable VPN service that’s compatible with Kodi. We recommend IPVanish to anonymize your Kodi activity.
- Download and install the VPN on your desktop or laptop.
- Download Kodi onto your computer.
- Connect to a VPN server. Connect to the server closest to you for the fastest speeds.
- Open Kodi on your device and start streaming. Your streaming activity will be encrypted and hidden from your ISP.
Kodi is an open-source media player which lets you stream all your media in one place, regardless of its format.
If you’re using Kodi, then it’s recommended to use a virtual private network (VPN) alongside it. A Kodi VPN encrypts your streaming activity, hiding it from your Internet Service Provider (ISP), law enforcement, and copyright trolls.
You can install Kodi on most major platforms, but the setup process will differ. This is also the case with VPN installation.
Thankfully, we’ve outlined methods for installing Kodi and a VPN on every popular device and platform, sorted by difficulty. These methods work with all Kodi versions, including v21.0 Omega.
Method 1: Use Kodi with a VPN on Your PC or Mac
Required Materials: Computer or laptop, a trustworthy VPN.
Setup Difficulty: Very easy
Setup Time: 2 minutes
This method is the easiest for using a VPN with Kodi. You just need to download a VPN onto your desktop or laptop, install Kodi, and then run both concurrently.
We’ve outlined these steps in the box below.
Here’s how to setup Kodi with a VPN on Windows or Mac:
- Install a VPN on your computer. If you have trouble with this, follow our guide to installing a VPN on Mac and Windows.
- Download the Kodi app. Go to http://kodi.tv/download and follow the prompts to install the correct Kodi app for your operating system.
- Connect to the VPN. Open your VPN app and connect to a nearby server.
- Launch Kodi.
Method 2: Use Kodi with a VPN on an Android Phone
Required Materials: Android mobile or tablet, a safe Android VPN
Setup Difficulty: Very easy
Setup Time: 2 minutes
An Android phone is the easiest device to set up Kodi with a VPN. It’s simply a case of installing both apps from the Google Play Store.
Follow the instructions in the box below if you’re unsure.
Here’s how to setup a VPN and Kodi on Android:
- Open the Play Store on your Android.
- Search for your preferred VPN. If you’re undecided, we recommend ExpressVPN due to its sleek Android app design and excellent streaming capabilities.
- Download the VPN. Don’t open the app or connect to a server yet.
- Search for Kodi on the Google Play Store. Make sure you choose the Kodi app developed by the Kodi Foundation.
- Open your VPN and connect to a server. Ensure your VPN is active before launching Kodi to avoid any IP leaks.
- Launch Kodi.
Method 3: Sideload Kodi on Amazon Fire TV
Required Materials: Fire TV device, a secure Firestick VPN.
Setup Difficulty: Easy
Setup Time: 5 minutes
Adding Kodi to a Fire TV device allows you to create an all-in-one media player. While the Kodi application isn’t available directly from the Amazon App Store, it’s still easy to install.
Install Kodi on Your Fire TV Device
Here’s how to install Kodi on your Fire TV Stick or Fire TV Cube:
- Launch your Fire TV device and go to the Amazon App Store.
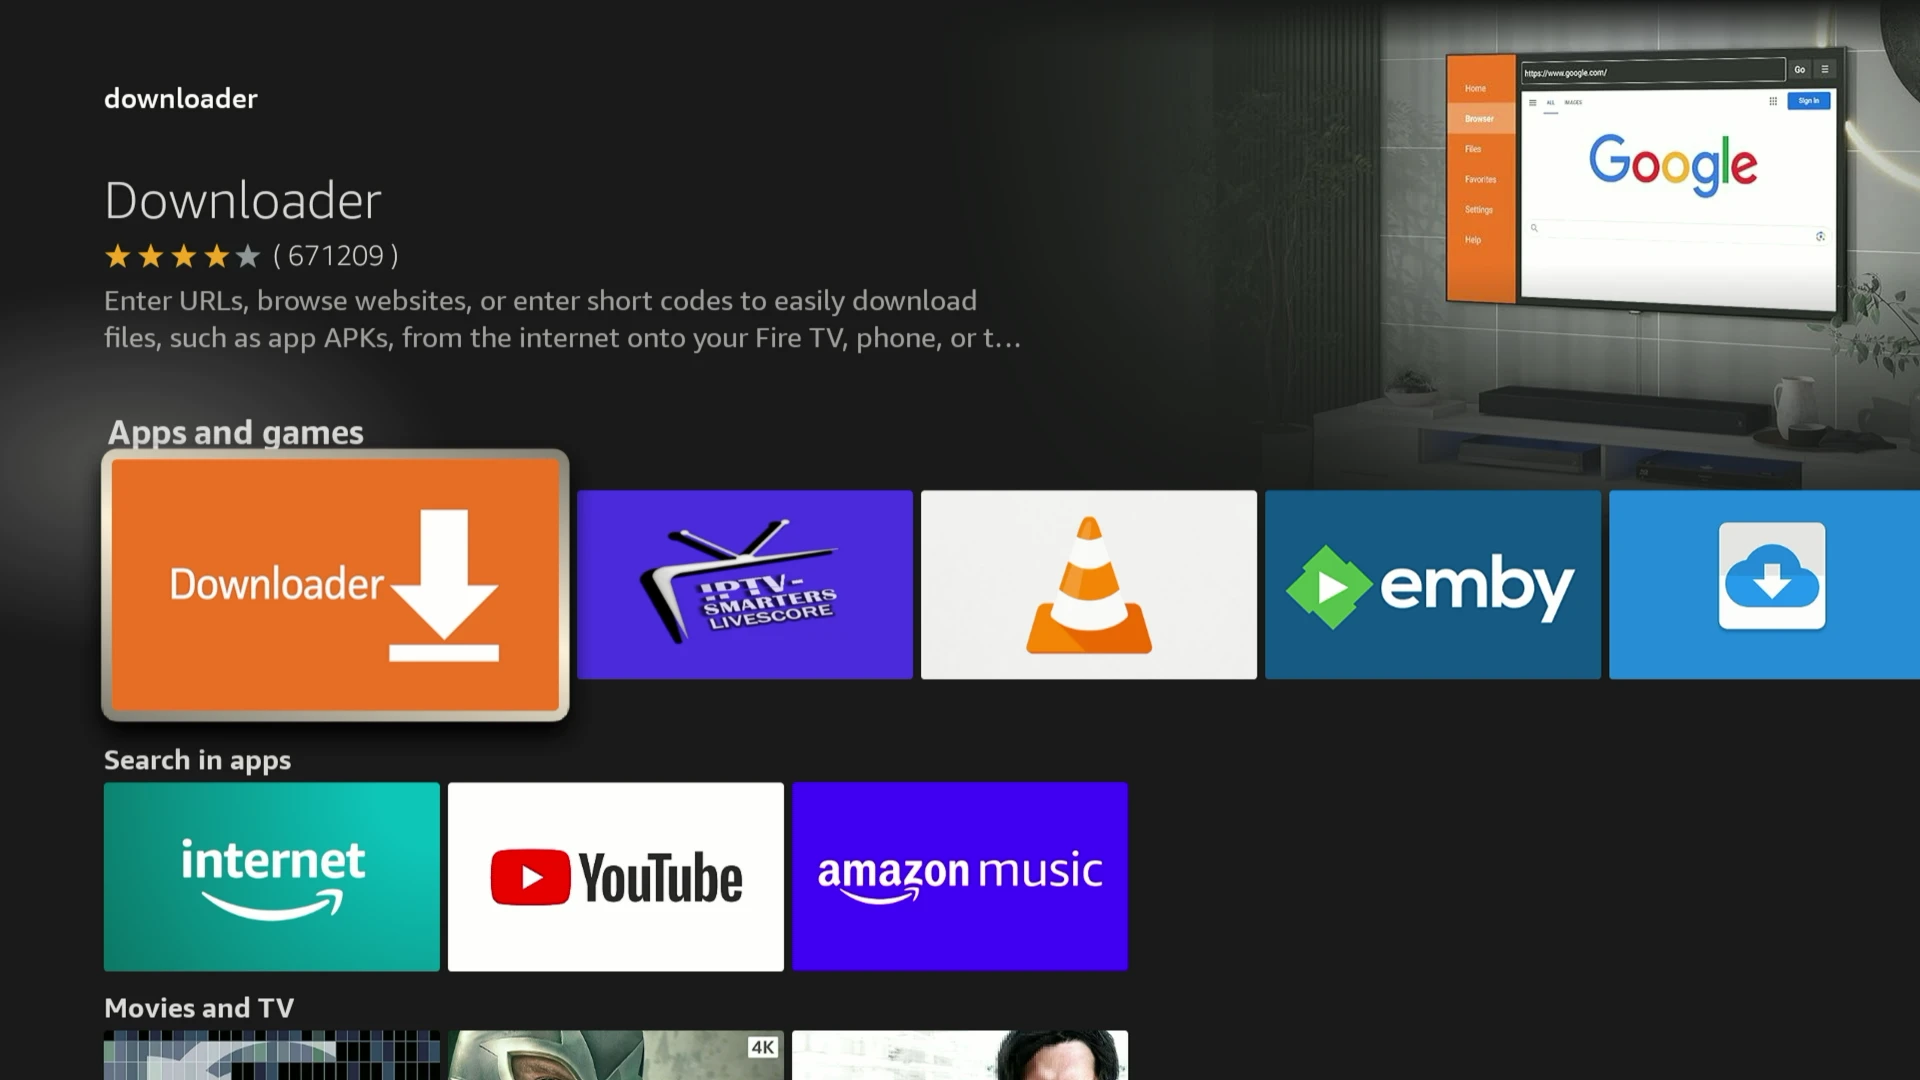
- Search for the Downloader app within the store and install it.
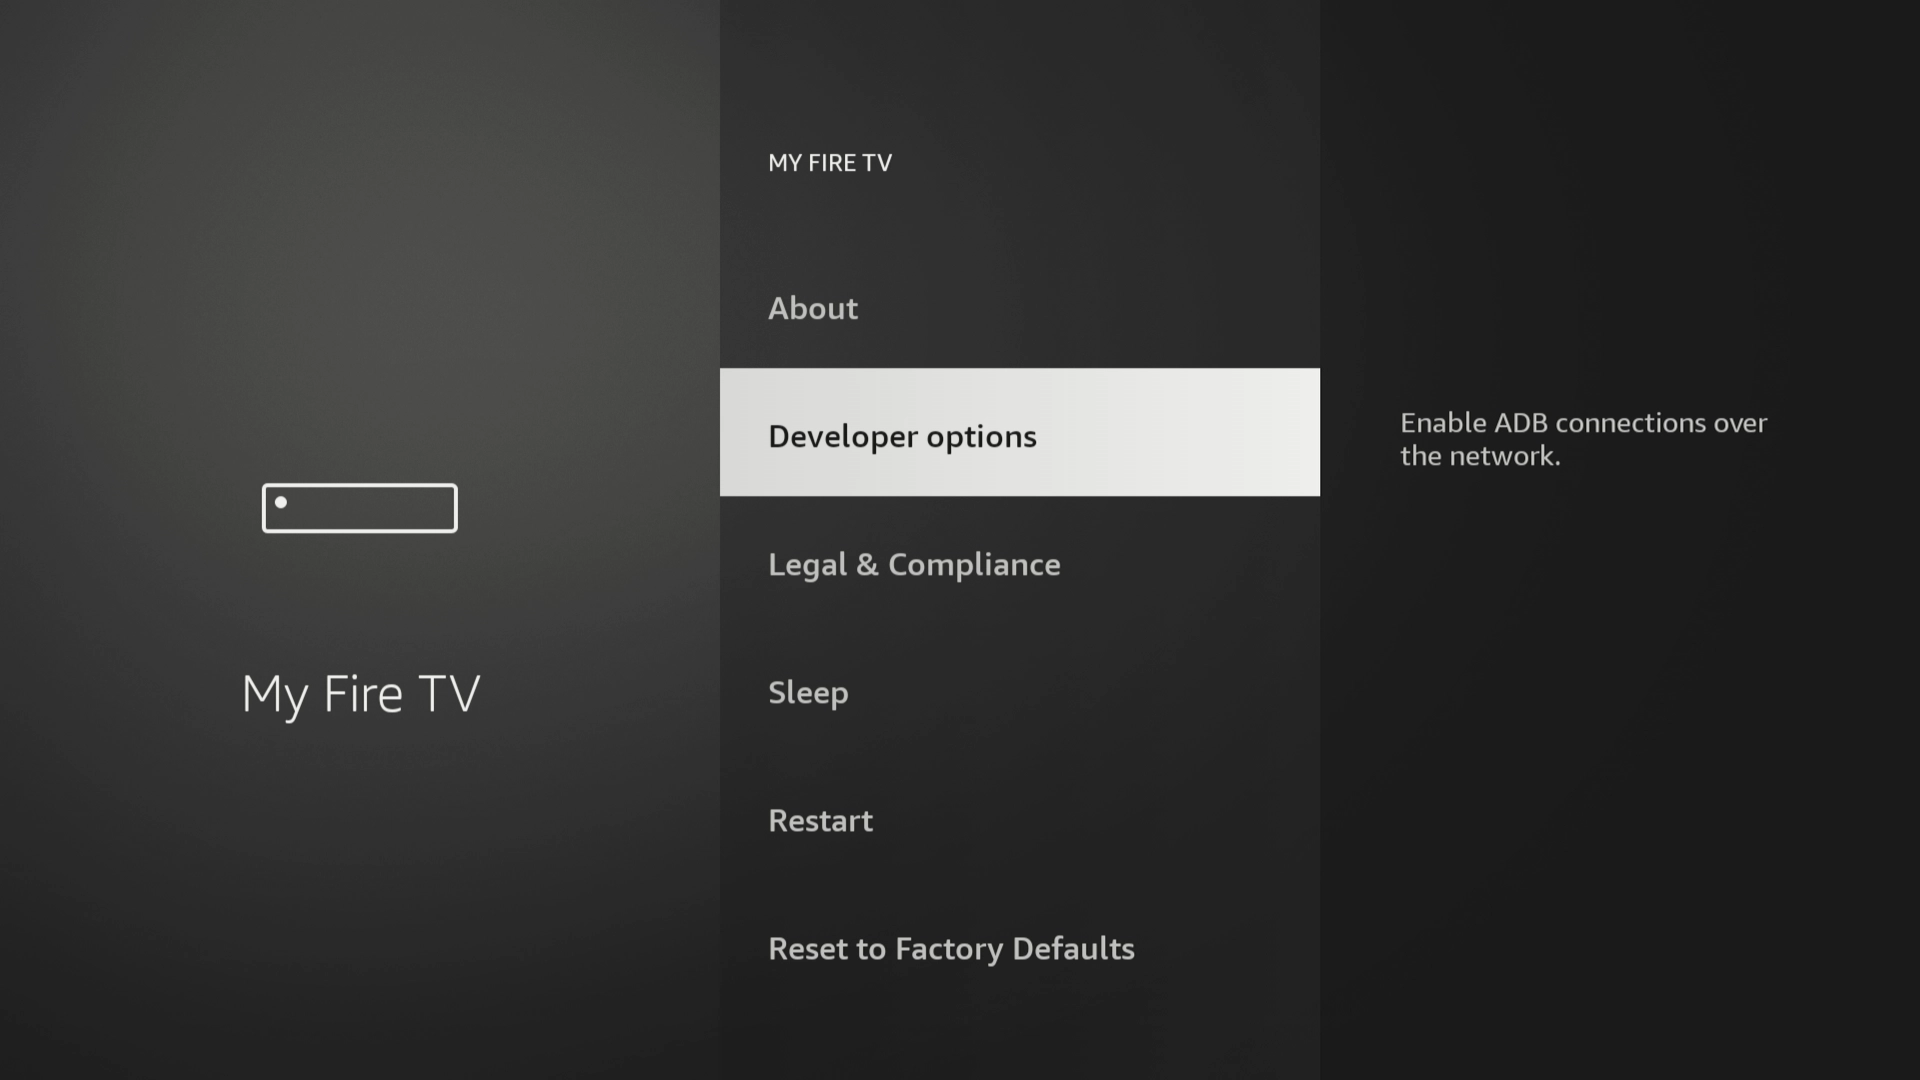
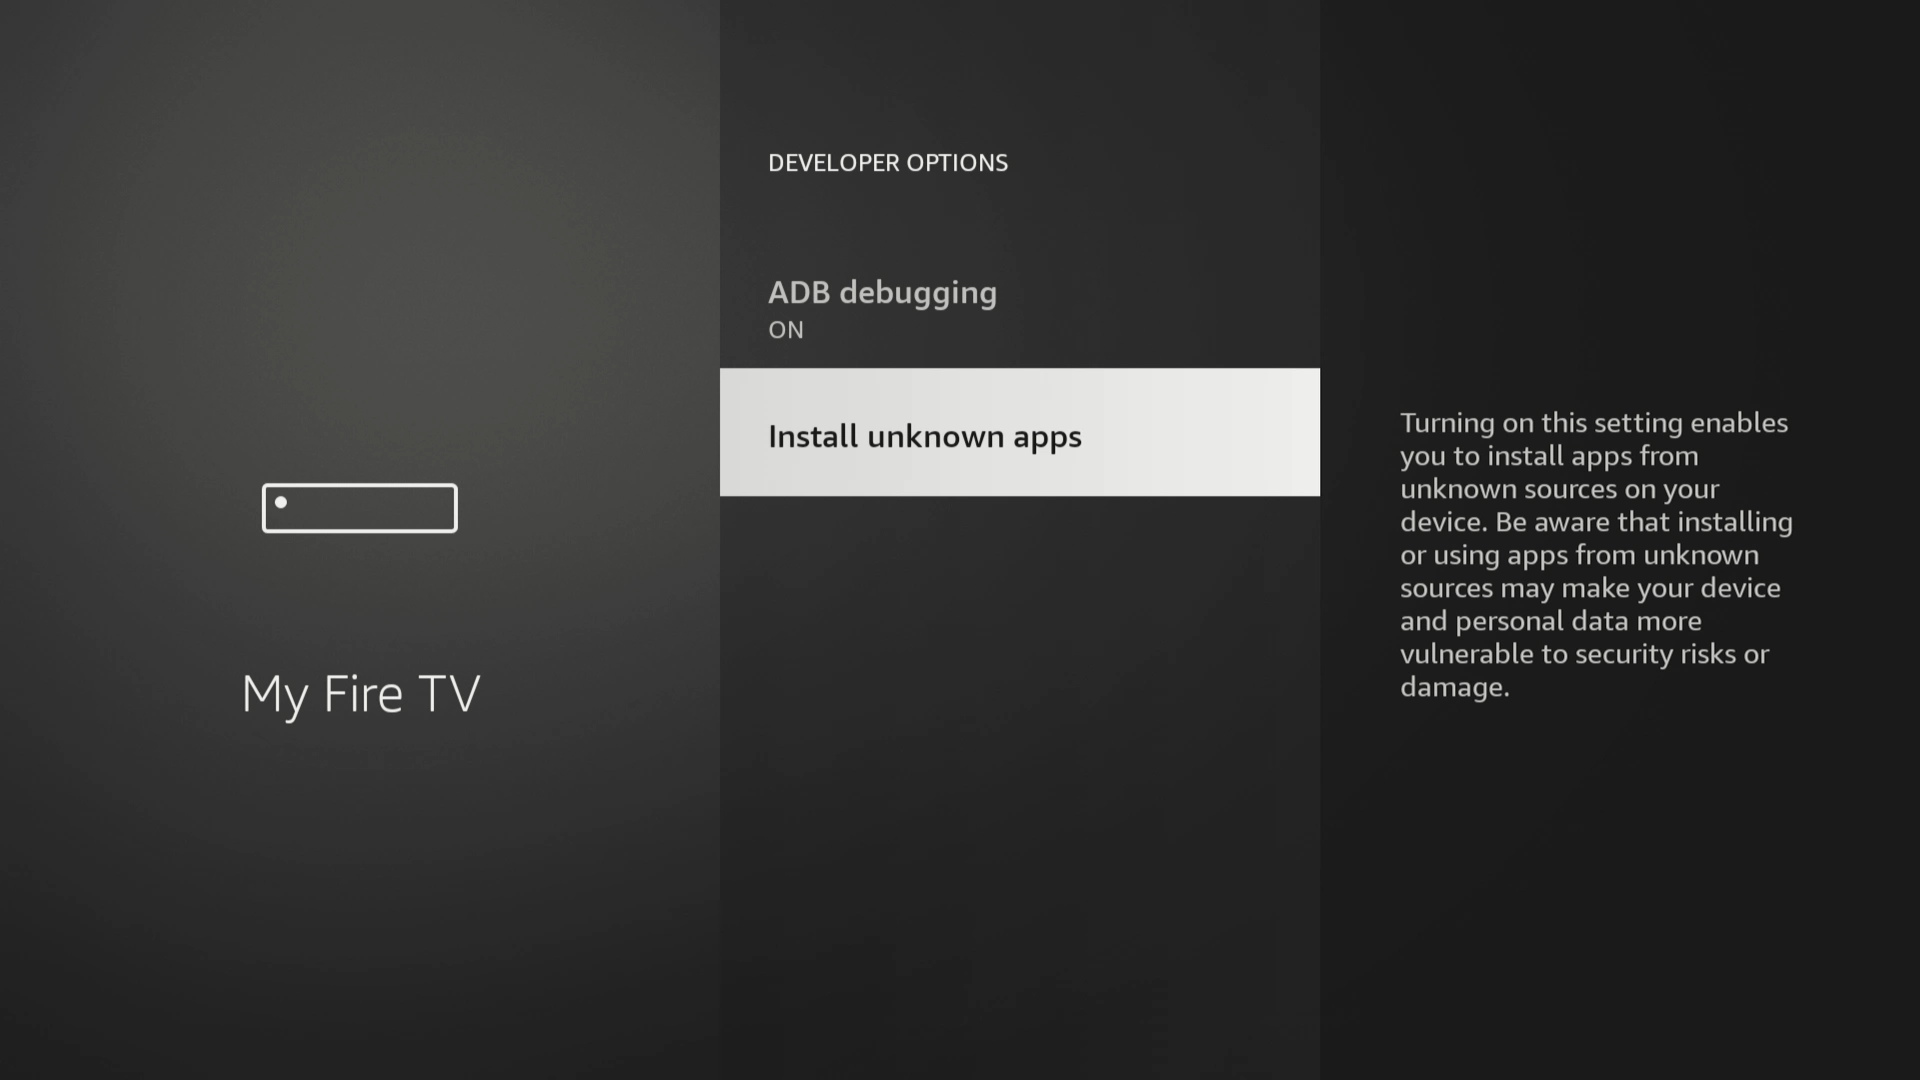
- Next, navigate to Settings > My Fire TV > Developer Options.
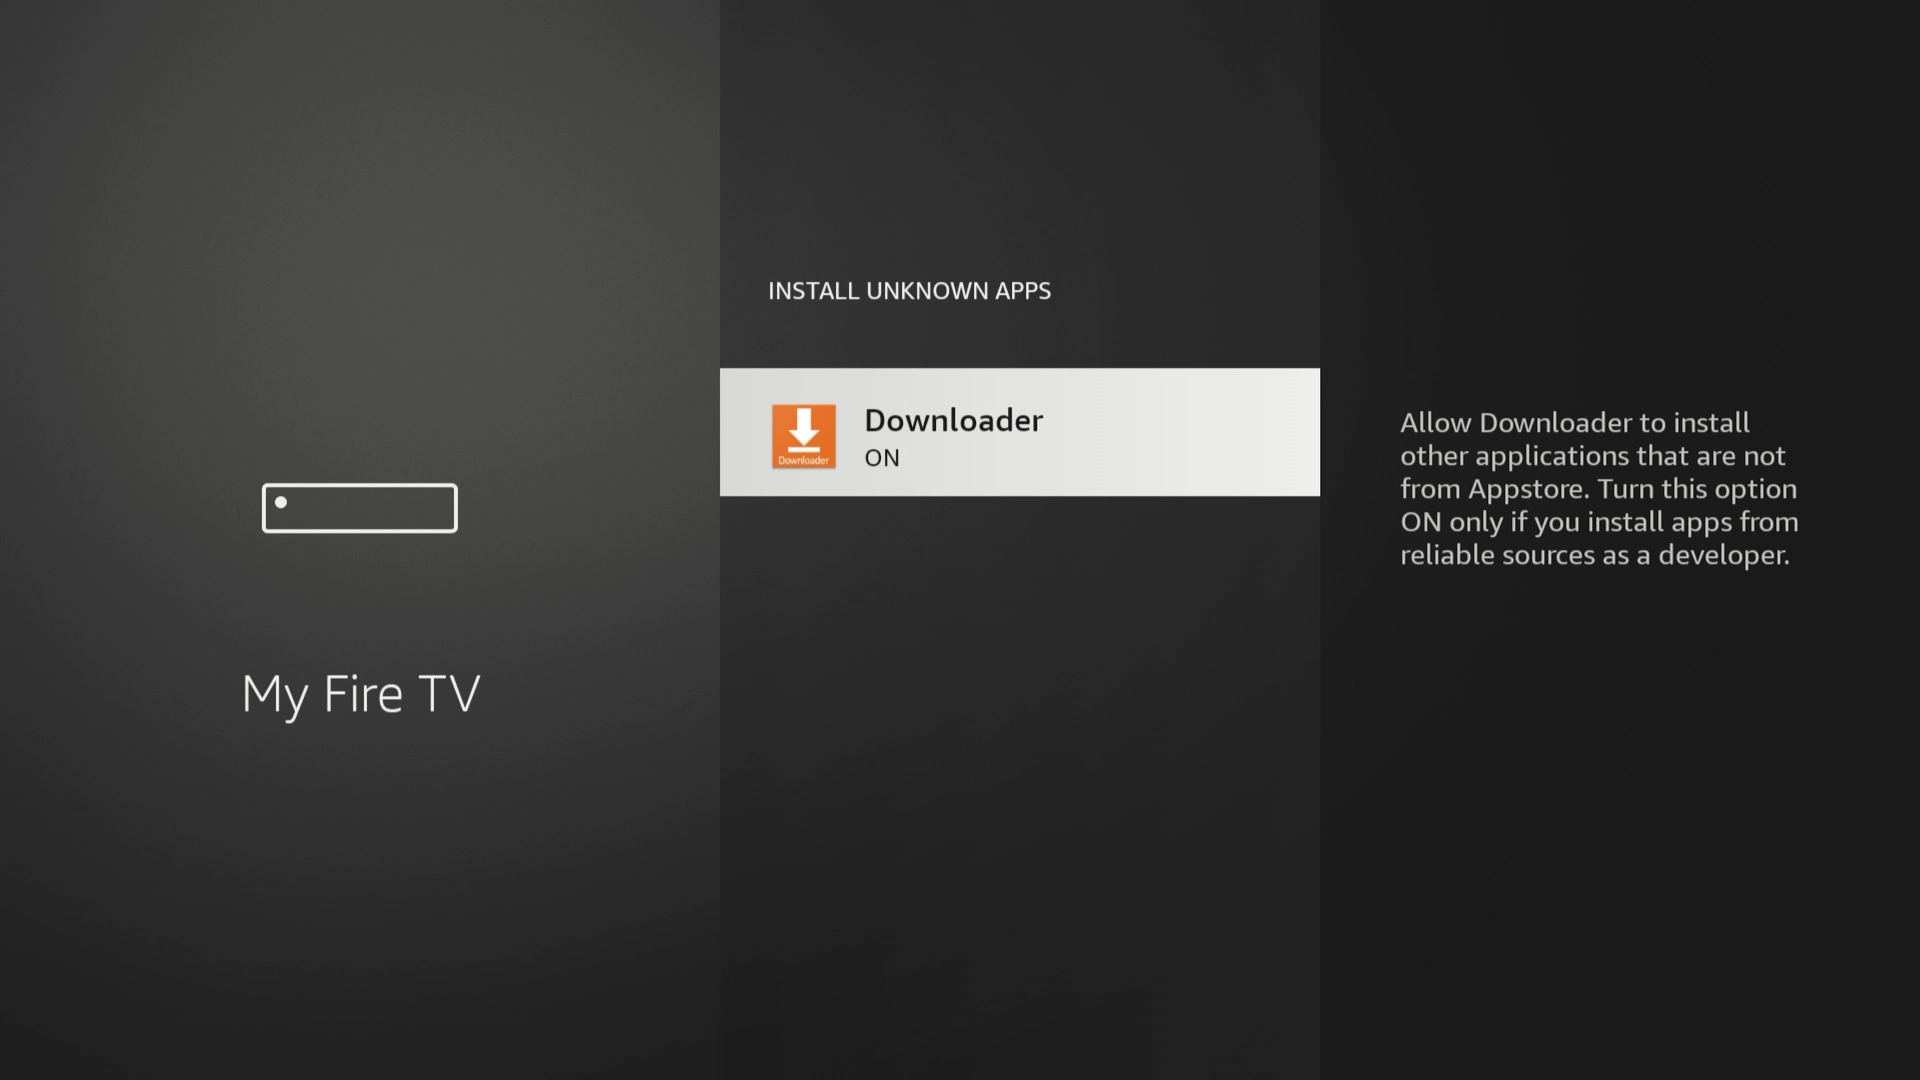
- Turn on ADB debugging and select Enable apps from unknown sources.
- Allow app permissions for the Downloader app.
- Open the Downloader app and allow it to access photos, media, and files on your device.
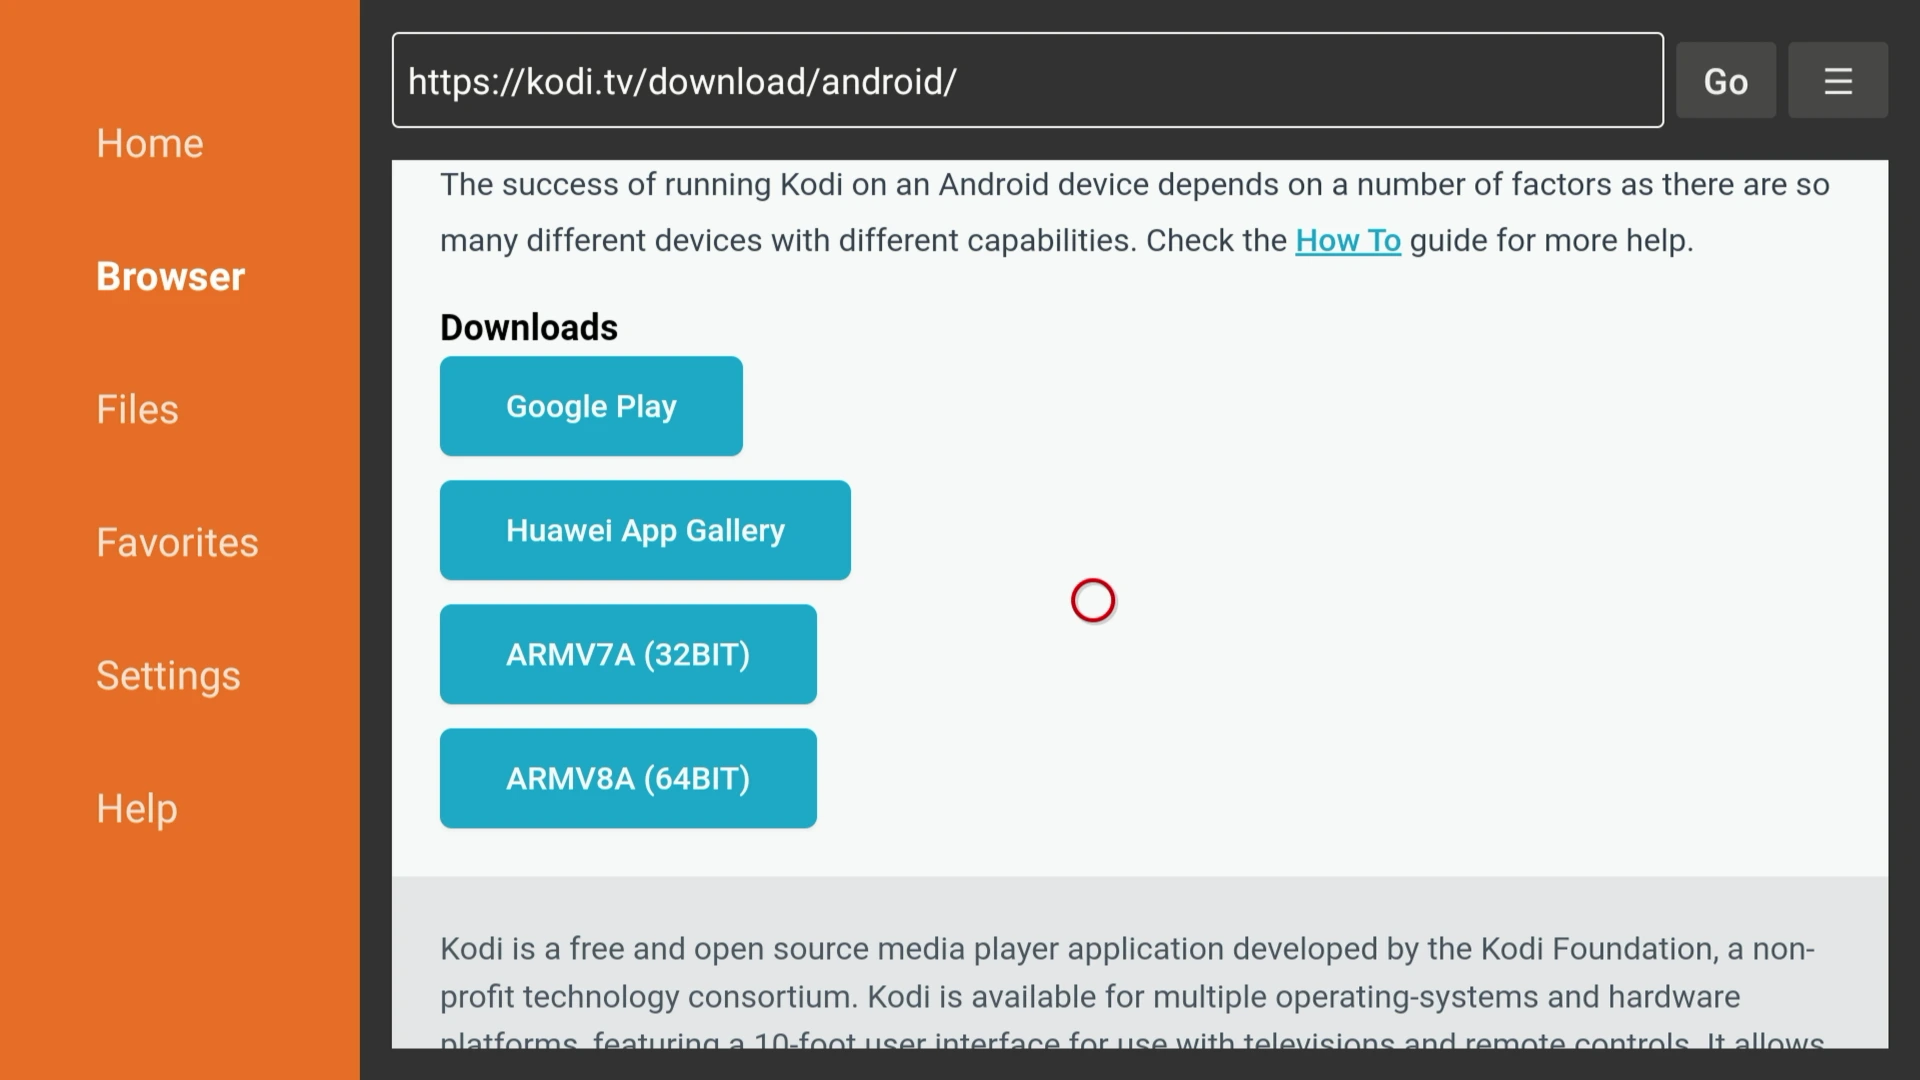
- In the URL field insert https://kodi.tv/download/android and select Go.
- Select and download the ARMV7A (32BIT) .apk file of the latest Kodi version.
- Once the Kodi application has finished downloading, click Install.

Once you’ve completed these steps, you can download your preferred VPN onto your Fire TV device.
Install a VPN on Your Fire TV Stick
The simplest way to install a VPN on your Fire TV is to navigate to the Amazon App Store, search for your chosen VPN app, and install it as normal.
Other more complicated methods include sideloading the VPN using an .apk file or installing the VPN on your router.
Method 4: Use a VPN with Kodi on Chromebook
Required Materials: Any Chromebook (ChromeOS 53 or higher)
Setup Difficulty: Very easy
Setup Time: 2 minutes
It’s easy to install a VPN and Kodi on your Chromebook, as both apps are available on the Google Play Store.
We’ve outlined how to install both apps in a few short steps below.
Here’s how to setup a VPN and Kodi on Chromebook:
- Go to the Play Store on your Chromebook.
- Search for your chosen VPN. Any VPN service with an Android app should be available on your Chromebook.
- Download the VPN. Don’t open the app or connect to a server yet.
- Search for Kodi on the Play Store. Make sure you choose the Kodi app developed by the Kodi Foundation.
- Launch your VPN and connect. Ensure your VPN is active before launching Kodi to avoid any data leaks.
- Open Kodi.
Method 5: Use Kodi with a VPN on Android TV
Required Materials: Android TV and a trustworthy VPN (for direct installation), USB flash drive and PC (for sideloading
Setup Difficulty: Easy (for direct installation), Medium (for sideloading)
Setup Time: 5+ minutes
As long as your Android TV supports the Google Play Store, you can simply download Kodi and your preferred VPN directly onto your device.
This method works with any mediaplayer running the Android TV operating system, including: Mi Box, NVIDIA Shield, and Google Nexus Player.
If for any reason you cannot access the Google Play Store from your device, you can also sideload Kodi and your VPN.
Follow the steps below to set up Kodi and a VPN on Android TV, using .apk files:
- Adjust your security settings. Go to Settings > Security and Restrictions and enable the option “allow apps from unknown developers”.
- Download your VPN’s .apk file. On your computer go to your VPN provider’s website and download the .apk files from your account dashboard.
- Download the Kodi .apk file. Go to http://www.kodi.tv/download, then click on the Android logo and select Google Play to download the Kodi .apk file.
- Download both .apk files onto a USB flash drive.
- Plug the USB into your Android TV.
- Access your USB stick using the file explorer app.
- Install the VPN and Kodi.
Method 6: Use Kodi with a VPN on iPhone or iPad
Required Materials: PC or laptop, a trustworthy VPN
Setup Difficulty: Medium
Setup Time: 5+ minutes
Aside from macOS, it’s generally harder to set up Kodi on Apple devices than other platforms as its app isn’t available on the App Store.
Other publications suggest jailbreaking your device to bypass this problem but we strongly advise against doing so as it can permanently break your iPhone or iPad.
Instead, we suggest you sideload Kodi onto your mobile device using Cydia Impactor for Windows or Mac. While this method is straightforward, you’ll need to redownload the Kodi app every seven days.
If you have access to a paid developer account then the Kodi app will remain installed, but it costs $99.00 a year.
Note: Before sideloading Kodi, we recommend downloading a VPN onto your iOS or iPad device first.
Here’s how to sideload Kodi onto iOS using Cydia impactor:
- Download Cydia Impactor onto your PC or Mac. The download link can be found on the Cydia Impactor website.
- Download the latest Kodi .ipa file. This can be downloaded from the iOS Ninja IPA library.
- Connect your iPhone or iPad to your computer. This can be done with a USB cable.
- Drag and drop the .ipa file from Step 2 into Cydia Impactor.
- Select your iOS device from the drop-down menu. It should be the only option listed.
- Enter your Apple ID credentials when prompted. If you’re not comfortable providing this, we suggest creating an alternative Apple ID.
- Wait for the app to install.
- Navigate your device settings. On your iPhone or iPad, go to Settings > General > Profiles & Device Management and then click the profile with your Apple ID.
- Click Trust.
- Connect to your VPN and open Kodi.
Method 7: Use VPN Add-Ons for Kodi
Required Materials: Windows PC or Linux
Setup Difficulty: Hard
Setup Time: 5+ minutes
You can also install a VPN as an addon within Kodi on PC or Linux. This allows you to change your VPN settings without exiting Kodi, but it also comes with significant drawbacks.
Most notably, not all VPN services support this configuration, the setup process is difficult, and most VPN Add-ons don’t work on Mac.
Our instructions below assume that you have already installed Kodi on your Linux or Windows PC. Moreover, we recommend using Zomboided VPN Manager as it is a reputable add-on that works with the greatest number of VPN services.
Here’s how to install a VPN within Kodi using Zomboided:
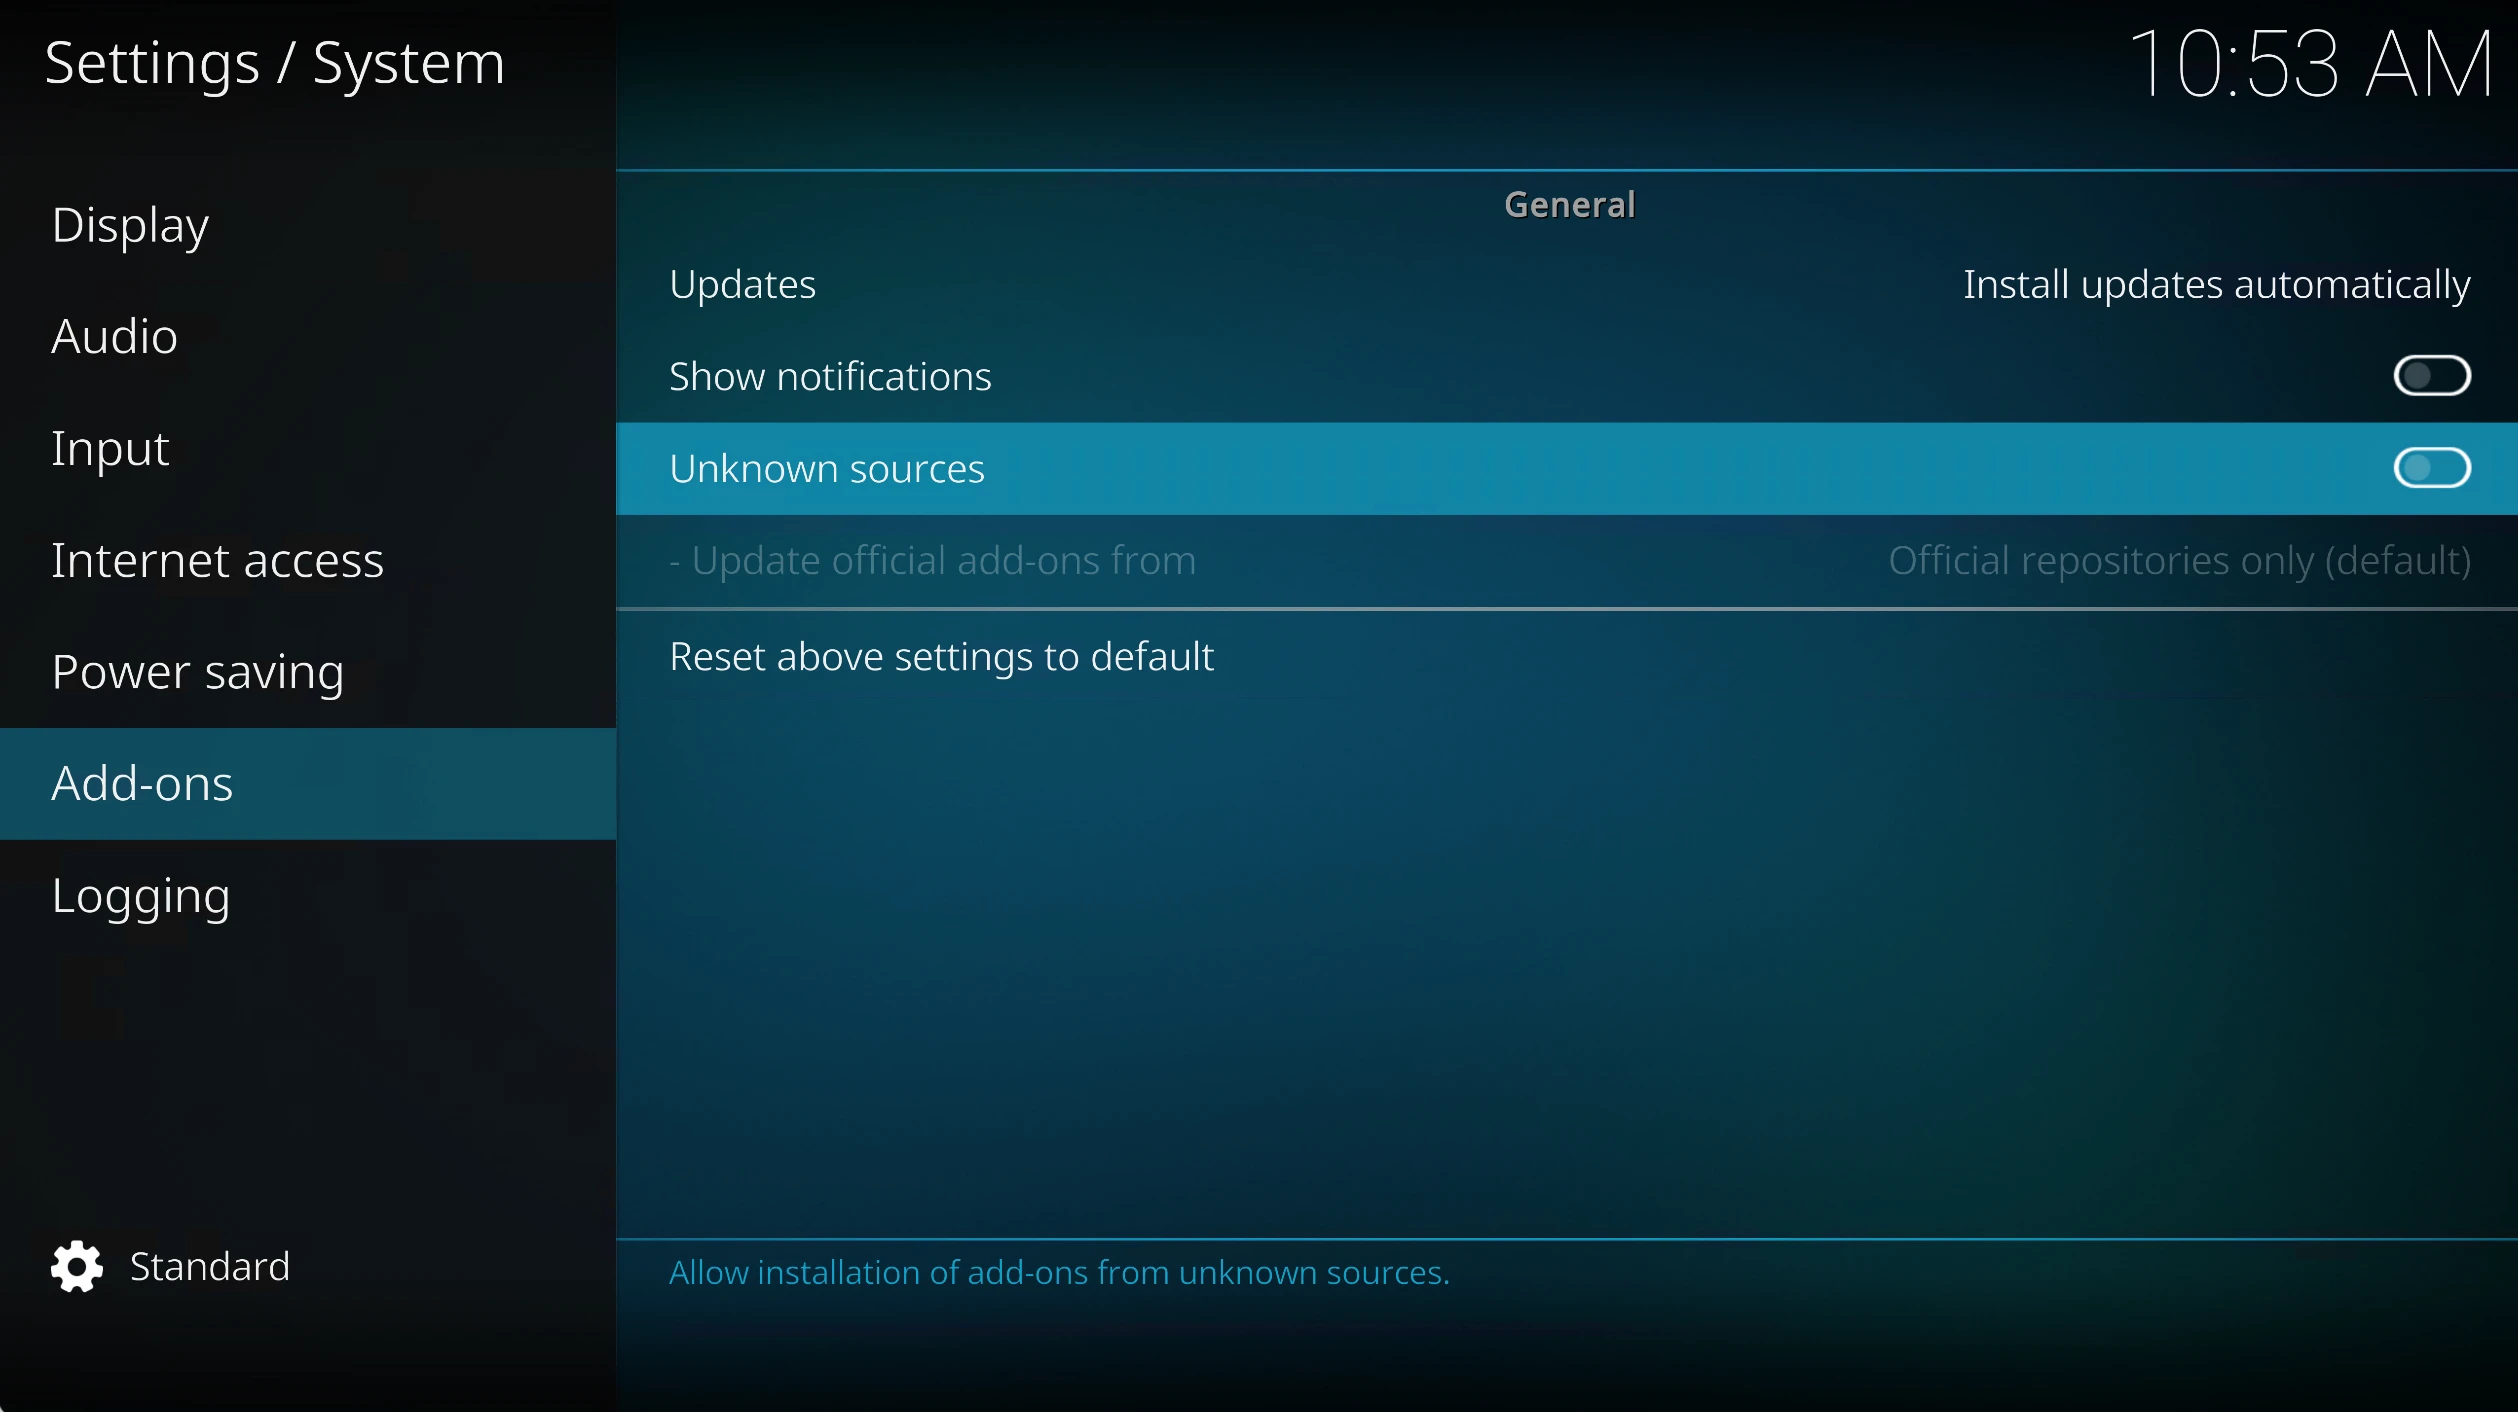
- Launch Kodi and go to your Settings menu. This is represented by a gear symbol within the Kodi app.
- Turn on the Unknown sources toggle. This can be found under System > Add-ons.
- Click Yes on the warning message.
- Download the latest release of Zomboided to your device. This can be located on Zomboided’s GitHub page.
- Install Zomboided’s ZIP file. In your Kodi, go to Settings > Add-ons > Install from zip file and select Zomboided ZIP file.
- Linux machines running LibreELEC or OpenELEC 7+ can skip to step 13. Windows and other Linux devices require OpenVPN installation.
- Download the OpenVPN installer. Exit Kodi and download the appropriate installer for your OS from https://openvpn.net/community-downloads/.
- Run the installer and designate its Destination Folder. When prompted, choose
C:\Progam Files\OpenVPN\as the Destination Folder. - Run Kodi as an administrator. You can find this option by right-clicking the Kodi desktop icon.
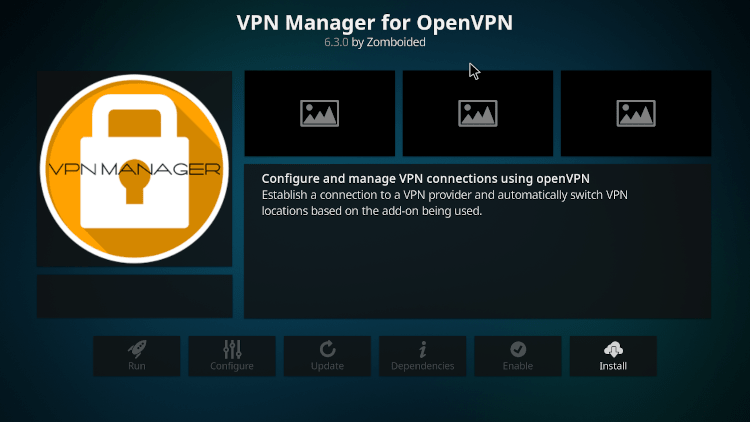
- Locate the OpenVPN installer on Kodi. Click the magnifying glass icon and select add-ons and then search for “VPN Manager for OpenVPN”.
- Install OpenVPN. Click on VPN Manager for OpenVPN and then select Install.
- Enter in your VPN login details.
- Complete setup. Accept the setup prompts to finalize installation.


Method 8: Install a VPN on Your Router
Required Materials: VPN-compatible router, VPN subscription, PC or mobile device
Setup Difficulty: Hard
Setup Time: 5+ minutes
If you want to use Kodi on a device that doesn’t support native VPN apps, then you’ll need to install a VPN on your router. This also has the added benefit of protecting every device that connects to the router.
That said, router setup is overly complicated and difficult, especially if you’re not tech-savvy. To simplify the process, you could purchase a router ‘pre-flashed’ which comes with the VPN already installed. However, this will cost at least $100.00 in addition to the cost of your VPN subscription.
For video walkthroughs, alongside written instructions, for every type of router installation we recommend referring to our dedicated router VPN setup guide.
Once you’ve installed the VPN onto your router, simply connect your Kodi to the same local network and begin streaming.
Method 9: Use Kodi with a VPN on Xbox
Required Materials: Xbox console, VPN router or VPN hotspot, VPN subscription
Setup Difficulty: Hard
Setup Time: 5+ minutes
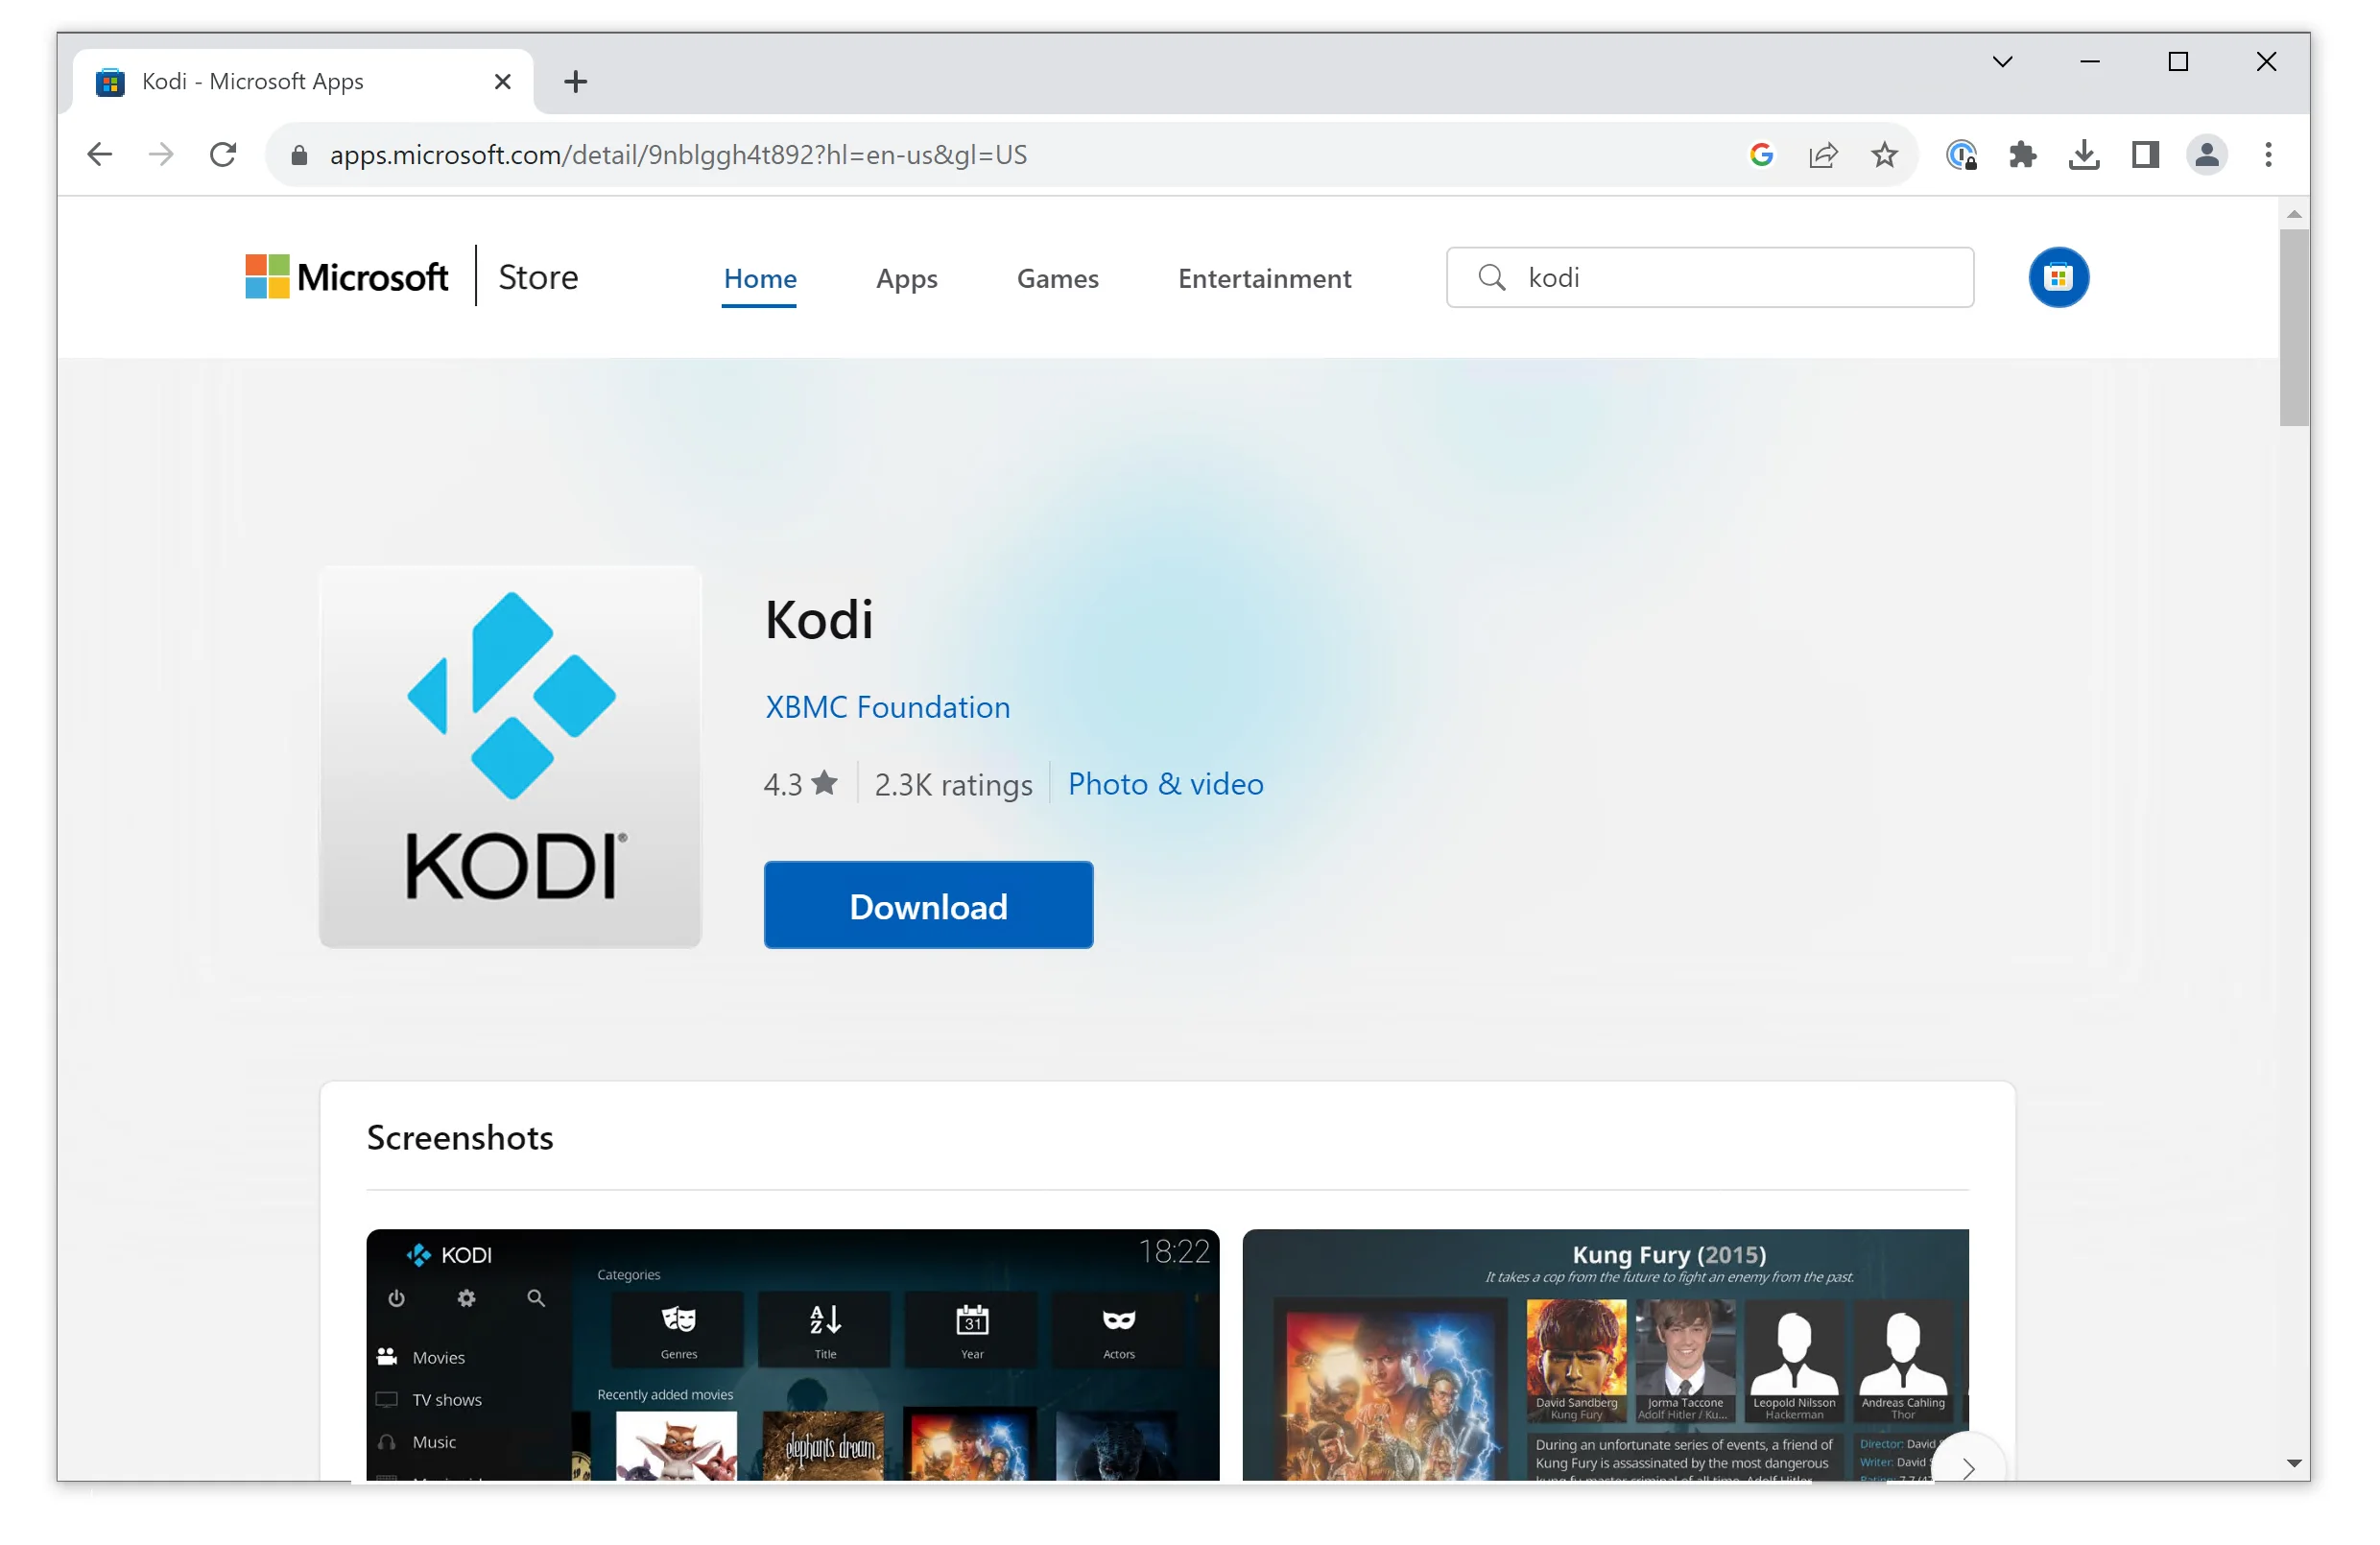
Kodi is available on the Microsoft Store. You can download it directly onto your Xbox console.
Sadly, this is not the case with VPN apps which aren’t supported on any Xbox. Instead, you’ll need to install a VPN on your router or share your connection via a hotspot to use a VPN on Xbox.
Method 10: Use Kodi on Apple TV 4K or HD
Required Materials: Apple TV (Gen 4 or later), VPN subscription, Mac, Xcode, iOS App Signer, USB-C cable
Setup Difficulty: Very hard
Setup Time: 15+ minutes
Apple TV does not have a native Kodi app, so you’ll have to use a workaround. This is a lengthy and difficult process which involves using third-party applications across multiple devices.
In fact, we strongly advise against following this setup process unless you’re well-versed with the Apple ecosystem.
Here’s how to set up Kodi on an Apple TV HD (Gen. 4) or Apple TV 4K (Gen.5):
- Connect your Mac to your Apple TV. If you have a USB-C cable and an Apple TV HD, you can simply plug in your macOS device and skip ahead to Step 2.
If not, follow the instructions below to pair your devices wirelessly:
- Open Settings on your Apple TV.
- Go to Remotes and Devices > Remote App and Devices. Keep your Apple TV open on this screen and return to your Mac.
- Launch Xcode on your Mac.
- Link your Mac and Apple TV. Go to Window > Devices and Simulators > Apple TV and click Pair.
- Pair your devices. Enter the verification code generated by your Apple TV into Xcode and click Connect.
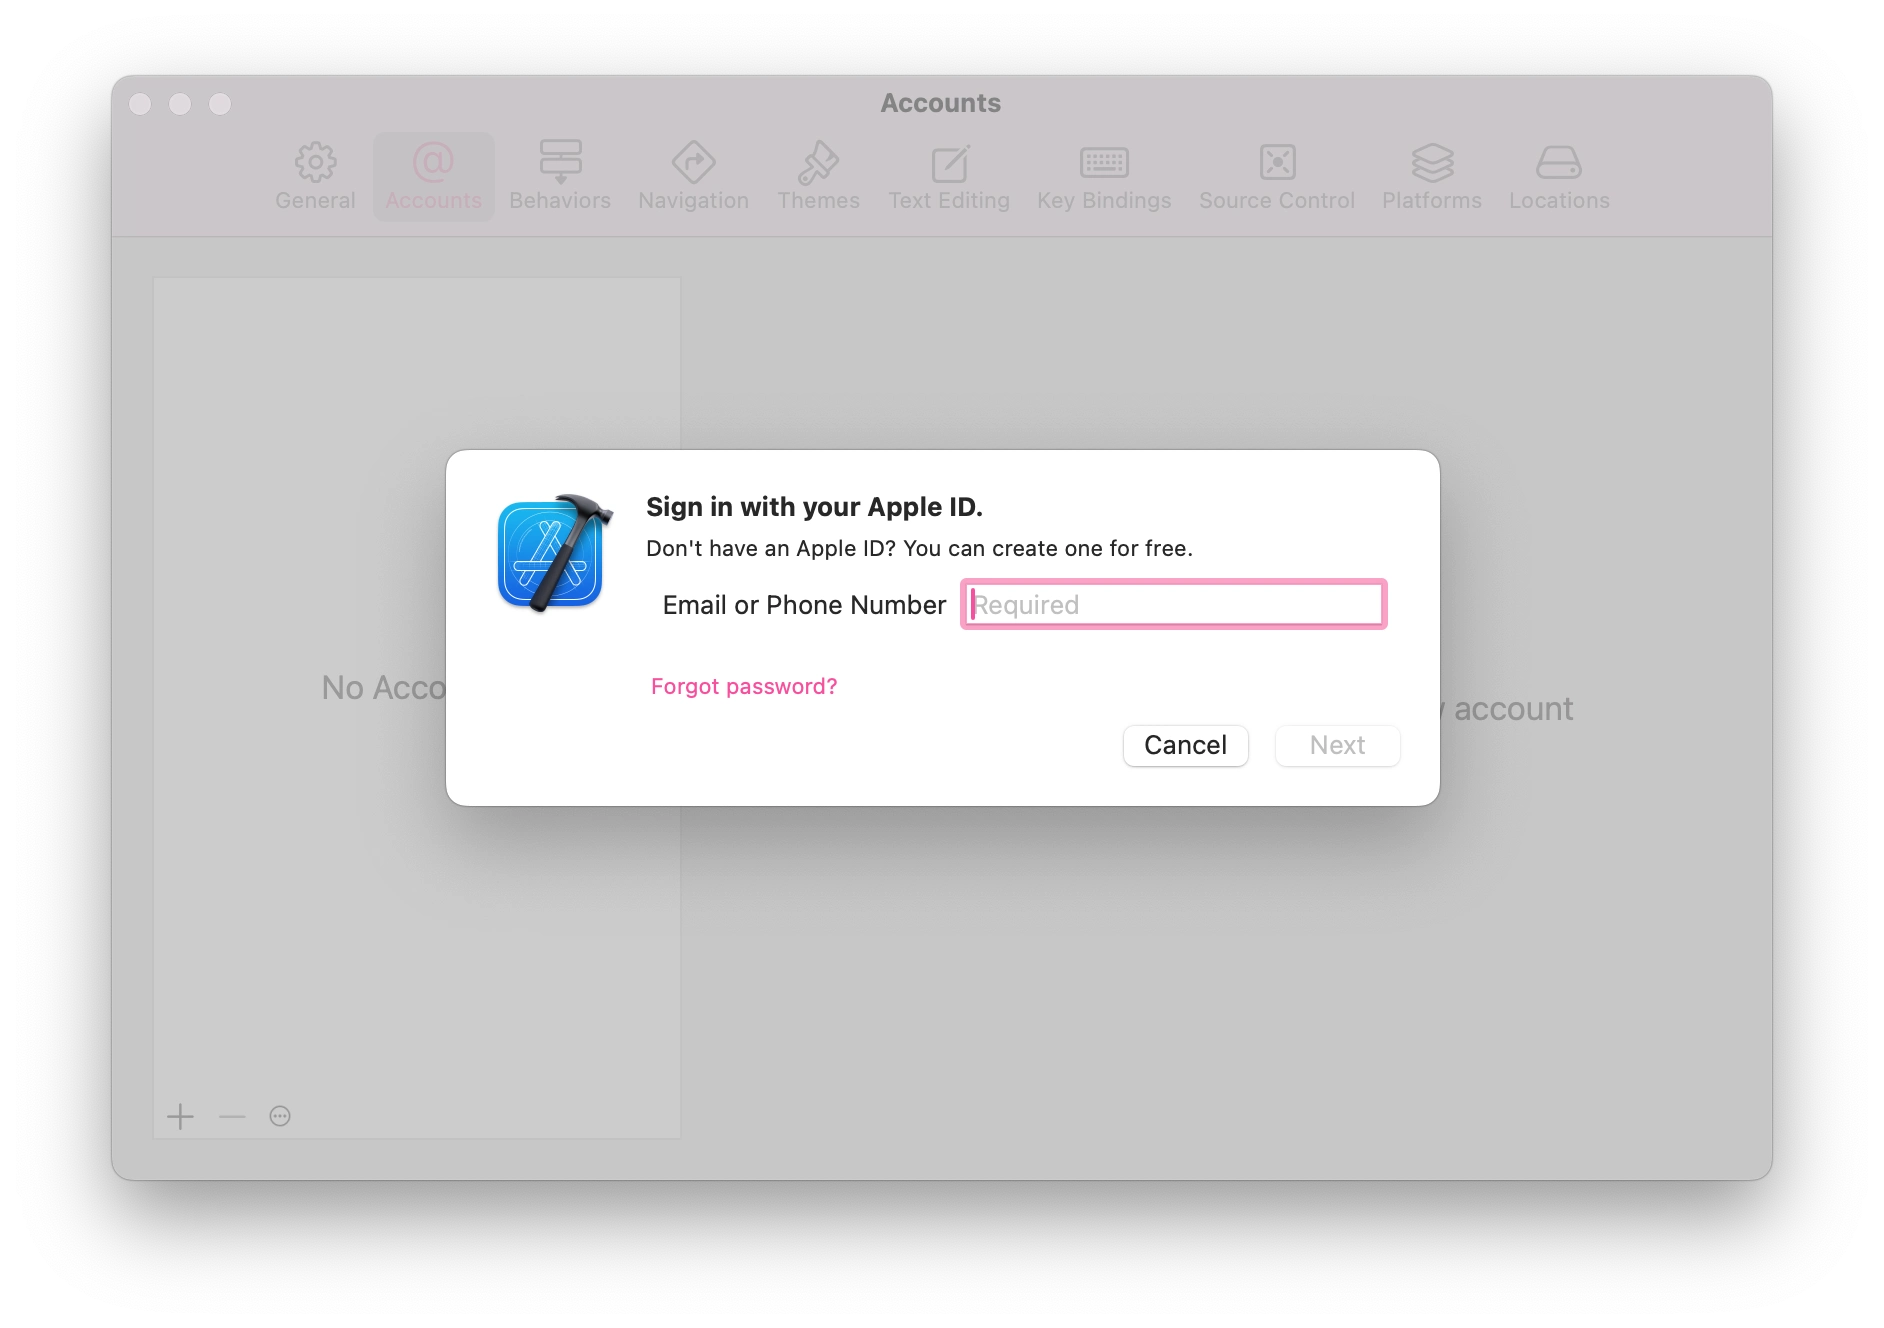
- Launch Xcode and access account settings. Go to Settings… > Accounts and click the “+” button, then select Apple ID > Continue.
- Add your Apple Account to Xcode. Enter your Apple account credentials and then click Next to link your account.
- Return to Xcode’s homepage and click “Create a new Xcode project”.
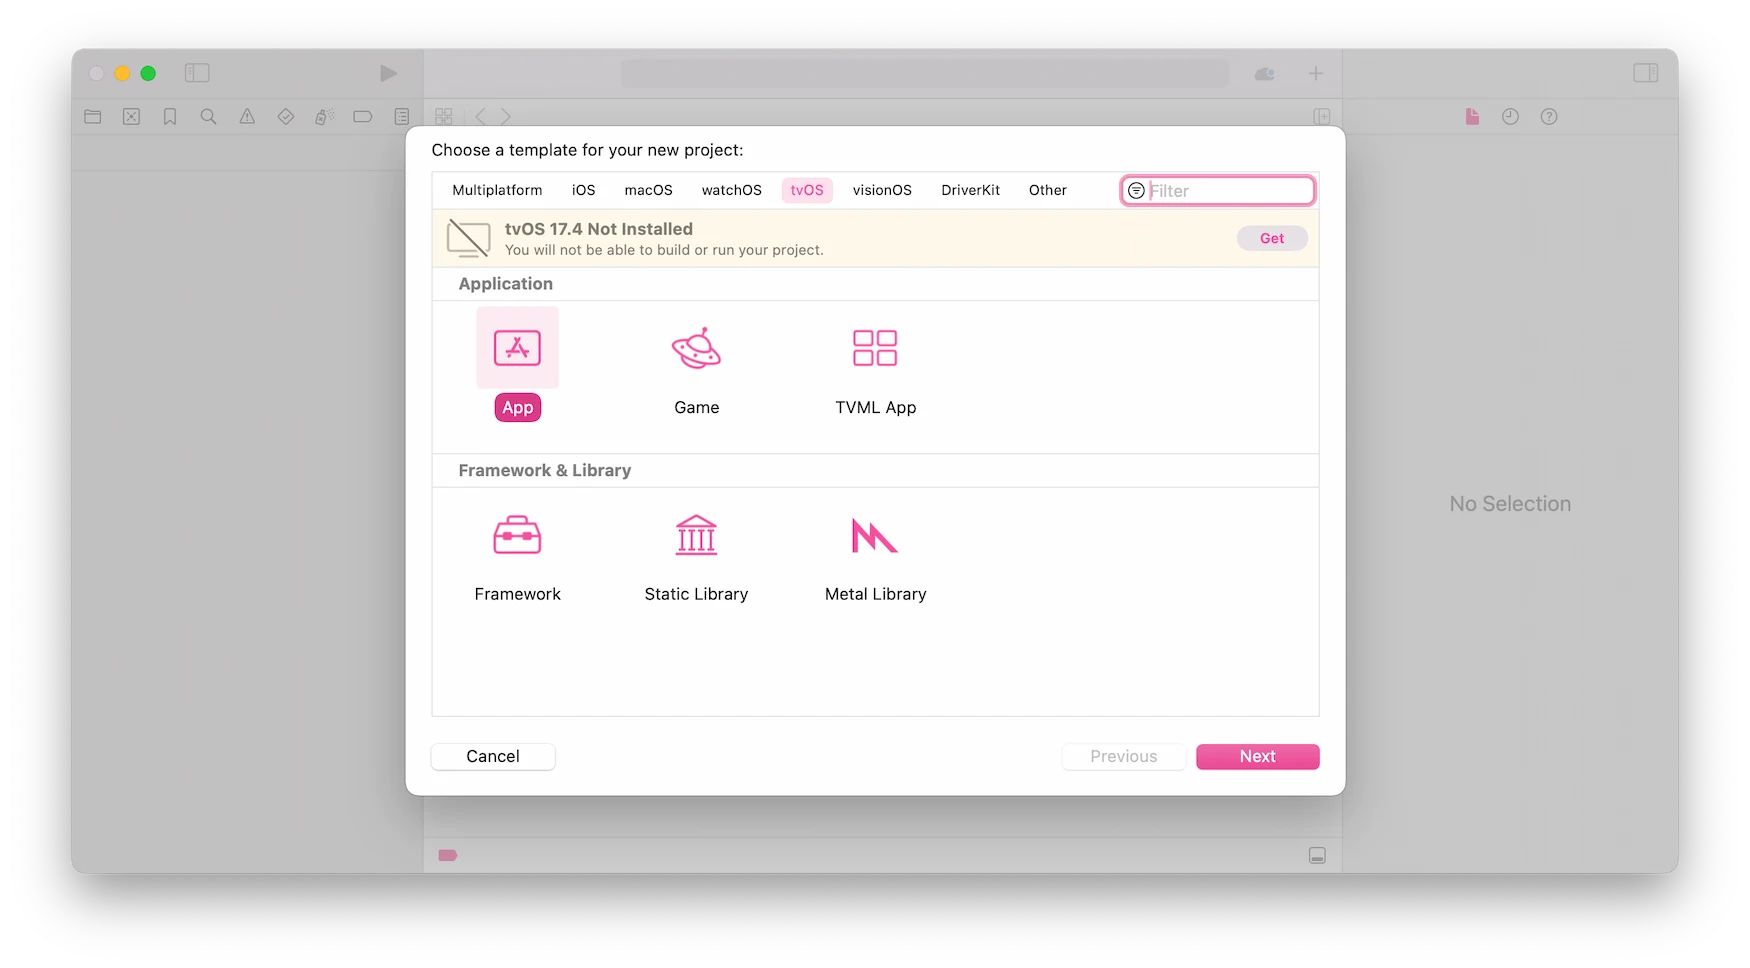
- Choose a template for your project. Click TVoS > App > Next.
- Fill in your project details with the following:
Product Name: Kodi
Team: Your Apple Account name
Organization Name: Your name
Organization Identifier: com.yourusernameClick Next to confirm.

- Create your Xcode project. Choose a location for the project then click Create.
- Link your Apple TV to your Xcode project. Click on the device list in the top left of Xcode and select your Apple TV device.

- Generate a Kodi deb file. Launch iOS App signer and click Browse, then choose the Kodi deb file.
- Sign the Kodi deb file. To do this, select your Apple account as the signing certificate and use the organization identifier from Step 6 as the provisioning profile. Finally, click Start.
- Save the deb file. Make sure you save the file in the same folder as your Kodi Xcode project.
- Start your Apple TV. Stay on the main screen and return to your Mac.
- Open Xcode and locate your device. Go to Window > Devices and Simulators and select your Apple TV.
- Install Kodi on your Apple TV. Click the “+” button and select your Kodi project and then “Open”.
Wait a few moments and Kodi should appear on your Apple TV’s main menu.
Once you’ve installed Kodi, you can simply download a tvOS VPN from the App Store. We recommend using IPVanish as it’s quick to set up on Apple TV and our best VPN for Kodi.
Method 11: Use Kodi with a VPN on Raspberry Pi
Required Materials: Raspberry Pi, compatible OS, VPN subscription
Setup Difficulty: Hard
Setup Time: 5+ minutes
The easiest way to set up Kodi on Raspberry Pi is to install an operating system which already has Kodi integrated within it, such as LibreELEC, OSMC, or XBian, but it can also be done from Raspbian.
Follow these steps first to set up a VPN on your Raspberry Pi:
- Download your VPN’s installer. Go to your VPN service’s website and download the appropriate installer onto your Raspberry Pi.
- Locate the installer file. Open terminal and type
cd~/Downloads/, then press Enter. - Extract the installer. You can do this by typing
sudo dpkg -i FILENAME.deb. - Activate your VPN. To do this, type
YOUR VPN activateand press Enter.
Enter your login details.
Once your VPN is set up, you’ll need to install Kodi. The simplest way to do this is to install LibreELEC:
- Go to LibreELEC’s website. This can be found at https://www.libreelec.tv/downloads/.
- Select Linux 32-bit or Linux 64-bit. This will vary depending on what your device is running.
- Follow the on-screen instructions to finish installation.